My kids planned a little getaway from the big city, to help me get over my jet lag (there’s a 10 hour time difference between Turkey and my home in Seattle.) Most people in Istanbul don’t own cars, so we did as what Turkish families do and hired a car service to take us to Sapanca (pronounced Suh-pawn-cha), about a 2 hour drive from Istanbul. A lake region which isn’t well-known to non-Turkish tourists, it was a perfect place for a little R&R.

Here’s the interior of the van that picked us up… seating for 7 in back!

Riding in style- thankfully air conditioned, since temps were in the high 90’s!

While there we went to a Circassian breakfast which was served in an outdoor garden with a bubbling well. A Turkish breakfast is known for setting out lots and lots of little dishes, usually with a cheese platter, tomatoes, cucumbers, hot dishes, cold cuts and more. The Circassians are an ethnic group who were mostly exiled to Turkey and the Middle East in the aftermath of the Russian-Circassian war, which ran for 101 years from 1763-1864. As I read about the Circassian people, I was frankly horrified at my ignorance. But, that’s not really a topic for me to go into here… the breakfast spread was different and delicious, as you can see:

Daughter-in-law Zeyneb and I with our Circassian breakfast spread!

Beautiful setting of the Circassian restaurant

The Nazar is the blue circular or teardrop design with a blue glass field with concentric circles including a blue or black dot superimposed on a white or yellow center. It is used in Turkish culture to ward away the “evil eye”.

Nazar

At times, you come across a “nazar tree” such as this one in the Circassian restaurant’s garden:

On the final day of our Sapanca stay, we went to the lake for a paddle boat ride.  They had all sorts of shops on the shoreline, including one that had sets of embroidered household sets, like table runners and doilies.  These are commonly used in Turkish households, under coffee and tea service, etc.  I picked out one set with silver metalwork.

Five pieces in my set, laid out on my son’s carpet

Detail of silver machine-worked embroidery designs

The silver thread is machine stitched on netting

The netting and silver embroidery is zig-zagged onto the velvet fabric

I also picked up this small carpet, machine made, but I enjoyed the color and design:

Next up: Back to Istanbul!

Our exhibition for the Gail Harker Center for Creative Arts for Level 3 Advanced Experimental Stitch is now complete.  I say this with a sigh of relief twinged with a bit of sadness.  We’ve been in this course for the last 2 1/2 years… meeting every three months and working on homework just about daily during that time.  My friends in the class and I have grown artistically through the process that our mentors, Gail Harker and Penny Peters, have instilled as a way of working, applying design and testing to our artwork.

Christina's large-scale wall piece is a 3D Stumpwork heron, "Focused Intent"

Christina’s large-scale wall piece is a 3D Stumpwork heron titled “Focused Intent”


Graduates (L to R) Marilyn Olsen, Christina Fairley Erickson, Nancy Drake, Tutors Penny Peters and Gail Harker, and graduate Barbara Fox

Graduates (L to R) Marilyn Olsen, Christina Fairley Erickson, Nancy Drake, Tutors Penny Peters and Gail Harker, and graduate Barbara Fox

As part of the exhibition, each of the graduates had to give a talk and answer questions on some aspect of their studies or artwork.  I spent the majority of my time explaining my process for making my large-scale Stumpwork (or 3D embroidery) heron.

Christina describes how her 3D Stumpwork embroidery process includes making a painting of the design.

Christina describes how her 3D Stumpwork embroidery process includes making a painting of the design.

Christina shares her sketchbook of samples for making the 3D heron.

Christina shares her sketchbook of samples for making the 3D heron.


A second assessment piece was a 3D project (the wall piece wasn’t required to be 3D, I decided to stretch my artistic abilities and make it Stumpwork).  My vessel based on a wave went through numerous renditions.  Perfecting the shape through making models from paper, then from the heavy duty interfacing that stiffens the vessel took much more time than one would imagine.  Not to mention all the hours of beading and hand stitching!

"Upwelling" 3D textile art vessel by Christina Fairley Erickson

“Upwelling” 3D textile art vessel by Christina Fairley Erickson

We also had two historical projects for the class.  One focused on Native American stitchwork and the other on a study of Stitchwork brought to the US from European immigrants.  We made artwork based on pieces we found in our research, including some stitched samples.

Some spreads from Christina's Native American Stitch Study

Some spreads from Christina’s Native American Stitch Study

Christina's sample based on a Haida Eagle button blanket

Christina’s sample based on a Haida Eagle button blanket


I’m so appreciative of our tutors/mentors Gail and Penny, who led us on this journey.  As I have witnessed from their other class exhibitions, each of us as students were given the same guidelines but have developed our artwork into something uniquely our own.  I look forward to continuing on in class at the next level, when it’s offered… but I also look forward to catching my breathe after such a big push to put on an exhibition of this magnitude!  Here are some more photos of my work at the show (wish I could fit it all in!):

Dark & Moody contemporary hand and freehand machine embroidery by Christina Fairley Erickson

Dark & Moody contemporary hand and freehand machine embroidery

"It's NOT the Real Thing" - darned Pepsi cup and Christina Fairley Erickson's sketchbook design

“It’s NOT the Real Thing” – darned Pepsi cup and Christina’s sketchbook design for it worried everyone that someone had left a drink on the table with artwork!

"Crested Serpent Eagle" and "Cheeky Blue Heron" by Christina Fairley Erickson

“Crested Serpent Eagle” and “Cheeky Blue Heron”

Feelin' Good Triptych by Christina Fairley Erickson

“Feelin’ Good Triptych” by Christina Fairley Erickson was based on listening the the song “Feelin’ Good” by Michael Buble


As many of you know, I have been studying at the Gail Harker Center for Creative Arts for some time… I believe it’s 8 years now.  I’m just finishing 2 1/2 years in the Level 3 Advanced Experimental Stitch course.  Our class will be exhibiting coursework including assessment items, sketchbooks, presentation books, samples, and historical stitch studies at an exhibition on October 26-27.

Advanced Experimental Stitch Exhibition

Mark your calendars!  We will also have an artist talk from 10:30-11:30 am on Saturday October 27.

“Chili Pepper” by Christina Fairley Erickson
Freehand machine embroidery with decorative stitching and freemotion quilting

Make sure to check out the start of my Design Wall Weekends Blog Link Party coming Saturday April 6!

Well, I finally finished up my final 5 x 7″ block for the Salsa Quilt.  I had some fun with this and will be posting a couple of tutorials later this week for both how to do unusual lettering and a new freemotion quilting design.  I also will work on documenting my process for installing new fonts onto your computer, so you can play around with different lettering styles like this “Taco Modern” font I use in each of my salsa blocks.

I’ve been super busy this last week catching up after being gone for 5 days in the “Experimental Hand Stitch class.”  I’ve been working on continuing to complete my hand-stitch samples, which are quite relaxing to do.  I’ve also started cutting and piecing a new practice quilt, which I’m doing along with Leah Day’s Craftsy class.  Although I’m pretty comfortable with freemotion machine quilting, the more you practice, the better you get.  The one thing I haven’t completely decided upon is whether I’m going to do all the fillers which Leah suggests in her class, or whether I’ll pick and choose those which I want to do.  I’m not 100% thrilled with every design she’s picked, so I may just substitute some of my own, or others I’ve learned from Leah’s blog.

One thing that’s going to be a little different in the future is that I will be hosting a “Design Wall Weekend” blog linking party.  This will be open to quilters, fiber artists, mixed media artists, and book/art journalists who have blogs to help increase exposure to all sorts of great ideas.

Now, it’s on to do the sashing and binding for this quilt.  Not to mention, I will need to get going on a new 5 x 7 Challenge piece for next week!  So check back for tutorials later this week and I hope you will have some fun quilting this week.

You Might Also Be Interested in:

And the Winner Is… A Slice of Lime Peppers and Avocado

Check out these other great blogs:

Freshly Pieced

Freemotion by the River

Quilt Story

“Corn” by Christina Fairley Erickson
Machine Freehand Embroidery, decorative stitching, freemotion quilting

Red!  Thanks for all the comments, encouragement and opinions on the background for my corn piece.  The little ends of the corn husk were challenging to applique down, but you can see a bit of the organza husk standing up in the picture.  What you can’t really tell from the photo is how much the trapunto stands out.  The two longer corn rows have 5 extra layers of batting, making them stand about 3/4″ up from the backing. I cut each of the batting layers a little smaller than the last, so it really has a rounded look.  The lower ear of corn has less trapunto (3 layers), since it is behind the others.


I’m now working on my last piece, chili peppers.  I started with the green stems, then went on to the darker shadowed portions of the chili.

The difficult part of these is that they are so thin, it will be difficult to convey a 3-D effect or to trapunto them.  So I tried to sew both in the long/horizontal direction and also around the width of each chili, to convey the roundness of each.

One of the main things when doing thread painting is to keep on layering your colors to add more dimension and gradation.  If you just fill in one color butted up to the next, it will look flat and like a paint-by-number painting.  Blending the colors is very important.  Also, look for the unexpected colors.  In this chili, I found a small place where the shadow had just a touch of lavender… it adds a lot to the finished piece to have those little bits that your eye might not originally catch.

Finished “Chili” thread painting
Now I just need to do the background and then I’ll be on to putting all 9 of my Salsa blocks together!
You Might Also Be Interested in:

Corn – Red or Orange- 
You Vote!
Piquant Progress Fitting My Challenge 
with Showing

Please check out these other great blogs:

FreeMotion by the River by Connie Kresin

Quilt Story

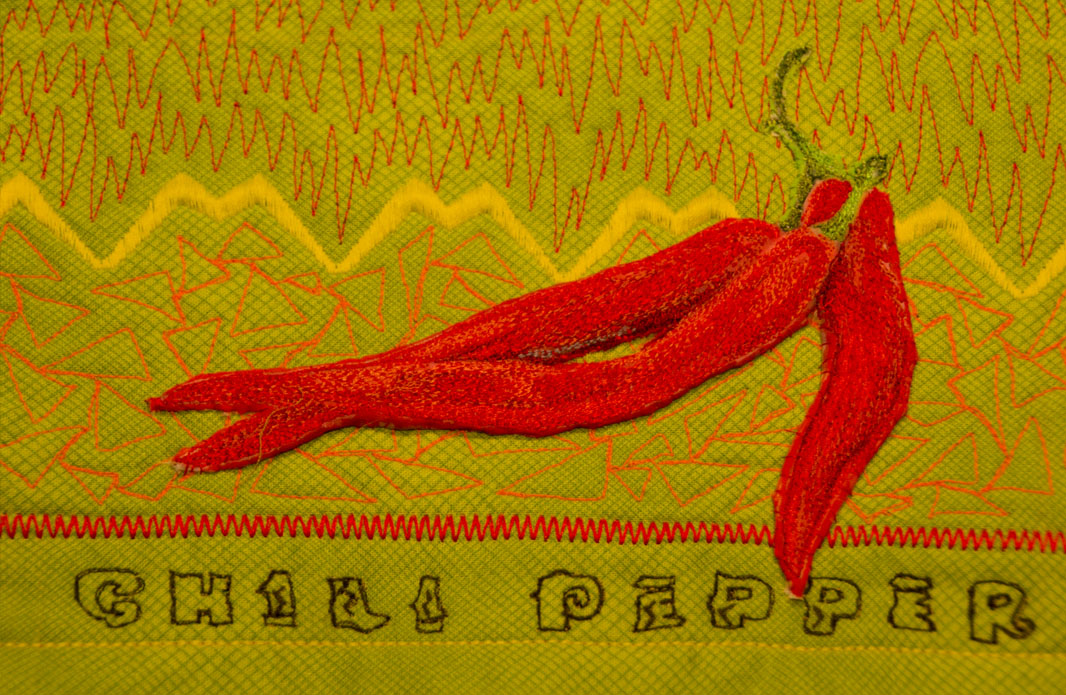
Well, I’m down to needed to pick out the background and do the freemotion quilting on my latest Salsa block- Corn.  I’m not sure about the background color, however.  Do you prefer the red or the orange?

This may have been the most difficult of my salsa pieces to date.  Trying to get individual kernels of corn was tricky.  I also wanted to have the husk seem more realistic, which I may work on a bit more.

Nylon organza pieces painted with Dye-na-Flow

I started thinking about the husk and how to make it seem like it could be peeled away.  I decided to use a painted nylon organza, which you could get layers of sheer that would build color.  I used Jacquard Dye-na-Flow to paint it, mixing a variety of greens and yellows.

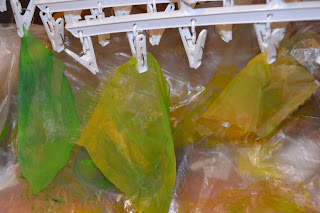
Nylon organza hanging to dry

When you paint the nylon organza, do it on a thin plastic sheet and wait until it is just starting to dry (it will be semi-sticky to the plastic.)  Then, peel it up and hang it to dry with clothes-pins or paperclips to a line.  If you leave it on the plastic, much of the paint will stay on the plastic and the surface of the organza gets a shiny odd texture to it.

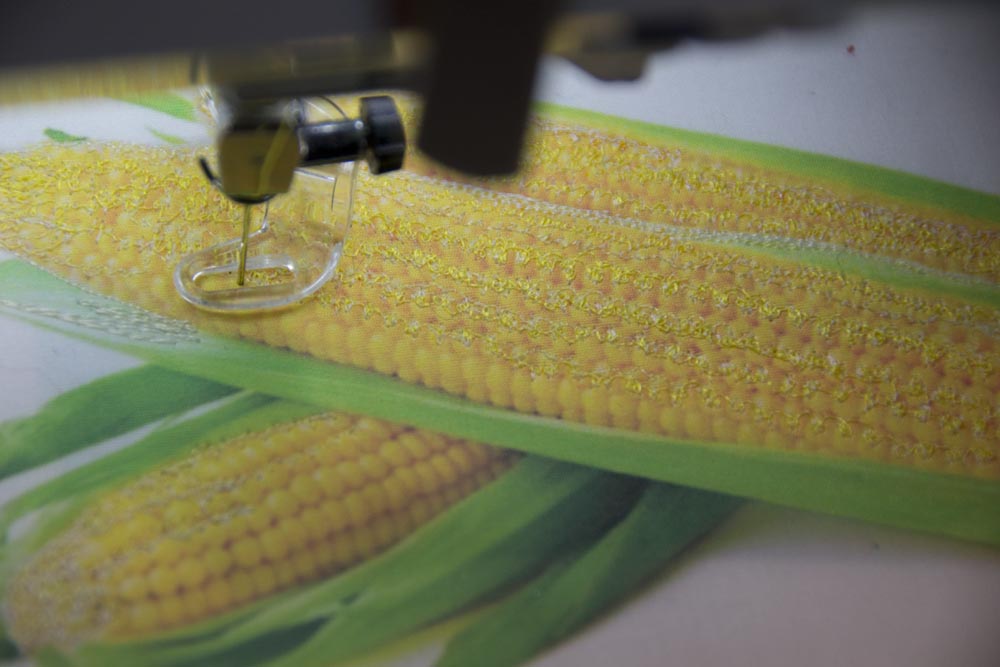
After painting my organza, it was time to get going with the thread painting.  Starting with a photo I’d printed on fabric, I began with the very lightest color first.  Much of these pieces were sewn in little circles, to imitate the shape of the corn kernels.  At some places it was more appropriate to make little scallops, to add highlighting or shadowing to the kernels.

I then layered on color after color of a range from pale beige through sunshine yellow to a dark mustard.  In between the rows, oranges predominated to add shadowing… even a touch of a pinkish-orange.

At the end, I added more of the sunshine and lighter colors again, to build up layers and make the kernels a little more dimensional, with the highlights sticking out.

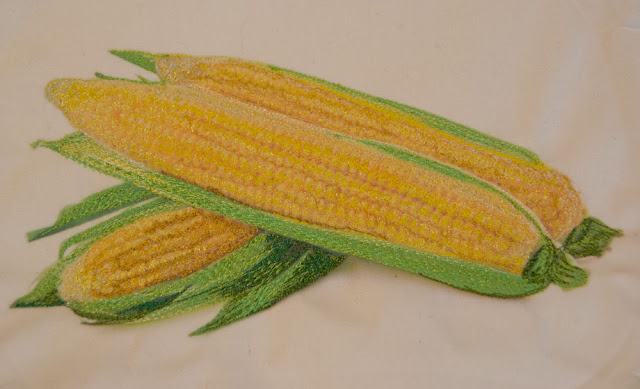
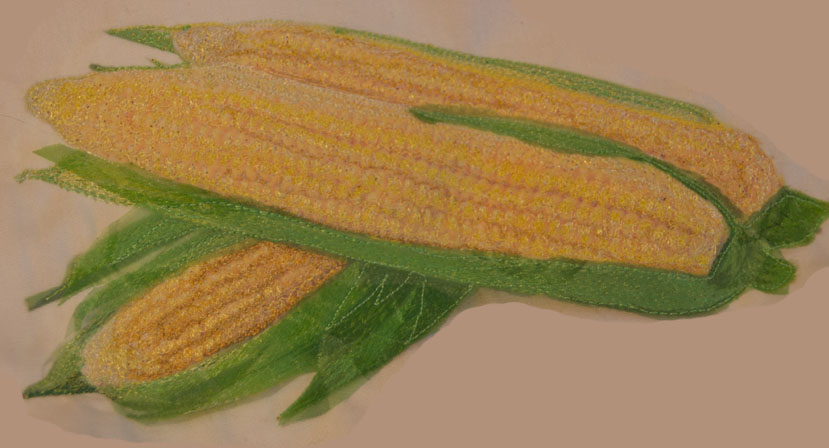
Corn with thread-painting over all, including husk


After the corn itself was complete, I thread-painted the husk.  I’m not completely sure about my process here or whether I need to do more (or even take away some of what I did.  After the thread painting, I laid some of the organza which I had painted on top and stitched it down.  I didn’t stitch it entirely over the husk areas, as I wanted some of the pieces to be able to fold back and move in a breeze, like a real husk would do.  After sewing it down, I cut around the edge of my sewing.

Completed corn with the organza husk

So, what do you think?  Red or Orange for the background?

By the way, as many of you know, I’m a big fan of Leah Day’s FreeMotion Quilting project.  If you’re looking to gain skill in freemotion quilting, Leah has just come out with a new class on Craftsy.  If you go to her blog, you can click a link and get the class for half price!  ($19.99 rather than 39.99.)

You Might Also Be Interested in:

A Slice of Lime Peppers and Avocado Cilantro – Si!

Make sure to check out these other great blogs!

Confessions of a Fabric Addict

Great post on stenciling and thermofax on Nina Marie Sayre’s Art Quilts

Limes by Christina Fairley Erickson
Freehand machine embroidery, freemotion quilting and decorative stitching

Do you get more and more productive the closer you get to a deadline?  This is a pet peeve of mine (not to mention my husband’s!)  Why is it that we have to get right up to a deadline before we get motivated?  I really thought that with my finishing each of the 5 x 7 pieces each week, I’d be looking great for the Salsa show’s deadline of April 6.  Perhaps I am doing fine… it’s a bit hard for me to know, since I’ve never made a quilt-as-you-go quilt.  I suppose I’m worried that putting it all together will prove a bit harder than I’ve imagined.  Two more 5 x 7 blocks to go.

Here are the other pieces completed so far:

Any thoughts on what I should do for sashing and putting them all together?
The lime seemed like it might be a bit tricky- there was a lot of reflective light in the photo and the juiciness of the cut lime.  I decided to start with the darker parts of the sliced half, and then added progressively lighter colors.  For the whole lime, I began with the outer edges (the parts furthest away) and worked my way towards the center.  
When I finished the machine embroidery, I completed the background with more decorative stitching and freemotion quilting.  I used the same sort of squared stippling that I’d used with the Peppers, which I’d learned on Leah Day’s FreeMotion Quilting Project.

Finally, I added the limes on top with extra batting to give them dimension (hand applique.) 

Working on the freemotion quilting
Quilted background completed

You Might Also Be Interested In:
5 x 7 Week 3- The
 Start of Salsa!
New 5 x 7 Challenge
Pieces 
Juggling Many 
Projects

Blogs I Recommend and Link-up:

Freemotion Quilting Project

Freshly Pieced

Nina Marie Sayre’s Art Quilts

Quilt Matters

Richard and Tanya Quilts

Confessions of a Fabric Addict

Only 3 more 5 x 7 pieces to go for my Salsa series!  They’re looking good all together.  I was a little worried that this red background might be too dominant with the rest of them, but it turned out fine.  I wanted the complementary color to the green of the avocado, and the dark skin of the fruit allowed me to use something quite bold… there’s no way that the pieces will fade into the background.  I’m still trying to figure out how I’m going to tie all the pieces together- I’m leaning towards black sashing that is freemotion quilted throughout.  I’d love to hear any thoughts or suggestions you might have about putting these pieces together into a quilt.

Yesterday I was reading one of my old favorite inspirational books, Simple Abundance: A Daybook of Comfort and Joy by Sarah Ban Breathnach.  Each day of the year has a separate little essay that looks for finding joy in your everyday life.  I’ve had this book and referred to it for probably about 15 years (it was published in 1995.)  It’s a lot like a wonderfully inspirational blog!  Anyway, the entry for March 4 is called “Priming the Pump for Inspiration” and uses the analogy of how you used to have to pour water into a pump to get it started.  Likewise, as artists, we need to feed ourselves images and experiences to keep the flow of creativity.

Similarly, Twyla Tharp, the famous dancer and choreographer, talks about setting rituals to get your creativity flowing.  If you set up a structure of doing the same thing each time you sit down in your studio (or on the way to your studio)… something that is inspirational, or centering, or creates peace for yourself… you will start to get greater access to your creative side.

I can’t say that I’ve got this process of ritual down at all.  I do lots of things to “prime my pump”, whether it be taking photos, cutting out images from magazines and putting them in sketchbooks, or reading books and blogs which I find inspirational.  But, typically I feel a little pressed for time and that I need to produce when I’m in my studio.  I’m rethinking this.  Perhaps I would be better served creatively to take the extra time, slow down a little bit, and follow a set ritual each day to start opening up my right-brain creative side.

You Might Also Be Interested In:

Developing the 
Creative Habit
Peppers and Avocado Cilantro – Si!

Some of my Favorite Blogs:

Leah Day’s FreeMotion Quilting Project

Connie Kresin’s Freemotion by the River

Nina Marie Sayre’s Art Quilts

Freshly Pieced

Quilt Story

Confessions of a Fabric Addict

Quiltsy