As many of you know, I have been studying at the Gail Harker Center for Creative Arts for some time… I believe it’s 8 years now.  I’m just finishing 2 1/2 years in the Level 3 Advanced Experimental Stitch course.  Our class will be exhibiting coursework including assessment items, sketchbooks, presentation books, samples, and historical stitch studies at an exhibition on October 26-27.

Advanced Experimental Stitch Exhibition

Mark your calendars!  We will also have an artist talk from 10:30-11:30 am on Saturday October 27.

UK Textile Tour Day 9: Audrey Walker at the Ruthin Craft Centre – Wales

One week before I was scheduled to leave on my trip, I received my “Embroidery” magazine, the publication from the UK’s Embroiderers’ Guild.  To my surprise, an article highlighted an upcoming exhibition at the Ruthin Craft Centre in Northern Wales of Audrey Walker’s amazing embroideries.  And it was opening one day after I was scheduled to drive North through Wales up to Scotland!

Christina Fairley Erickson with Audrey Walker's "Adam" and "Eve" stitched textiles (2000) and drawing study for "Eve".

Christina Fairley Erickson with Audrey Walker’s “Adam” and “Eve” stitched textiles (2000) and drawing study for “Eve”.  Adam and Eve each approximately 16″ w x 40″ high (the embroidery). On loan by Graham Holland.

As an artist who does a lot of pictorial work, I’ve been a fan of Audrey Walker’s work ever since my mentor and tutor, Gail Harker, introduced me to Audrey’s intricate stitched portraits.  So, without much hesitation, I worked out a change in my itinerary to stay an extra day in Wales, so I could see the exhibition on its opening day.

Detail from "Eve" by Audrey Walker 2000.

Detail from “Eve” by Audrey Walker 2000.

Audrey Walker’s six-decade long career in embroidery has influenced many contemporary embroiderers.  Not only is she an amazing artist in her own right, she succeeded Constance Howard as the head of the Goldsmith’s College Embroidery & Textiles Department (1975-88) guiding another generation of makers.  She focused on teaching her students to seek out and explore their ideas first, then to study the history and techniques to realize their artistic vision. Her first textile associate was Jan Beaney, who went

"The White Tulips" by Audrey Walker 2012. On loan from the Embroiderers' Guild UK

“The White Tulips” by Audrey Walker 2012 (approximately 48″ h x 16″ w). On loan from the Embroiderers’ Guild UK

on to become internationally renowned for her stitchwork, as well as being one of the Cities and Guilds tutors and evaluators who taught Gail Harker.  So, I guess I can claim Audrey is my embroidery great-grandmother!

Detail from "The White Tulips" 2012 by Audrey Walker

Detail from “The White Tulips” 2012 by Audrey Walker

This exhibition, in Audrey’s 90th year, is a retrospective of her work, with pieces coming from as far away as the U.S. (owned by private collectors) brought together at the Ruthin Craft Centre, the location of Audrey’s first solo exhibition 18 years ago.

Audrey’s start in textiles began ten years after completing her degree in fine art (mainly portrait painting), after seeing an exhibit of fabric collages by Margaret Kaye (1912-2002).  Prior to that , Audrey associated embroidery with the domestic textiles of her youth.  Rather than continuing on as a painter, textiles became Audrey’s medium of choice.  She even incorporated some of her family’s domestic textiles into her artwork, giving a nod of recognition to the historic roots of embroidery.

"A Cumbrian Birthday" 1997/8 embroidery by Audrey Walker uses a tray cloth from Audrey's childhood.

“A Cumbrian Birthday” 1997/8 by Audrey Walker uses a tray cloth from Audrey’s childhood. The embroidery (approximately 30″ w x 20″h) represents the Cumbrian tradition of offering guests a class of port and cream crackers with rum-butter on the best china, when visitors came to see a newborn baby.

Topics that have figured prominently in Audrey’s work include “momentary glances, encounters, inward smiles, the power of a gaze, vulnerability and the simple pleasures of life”.  Some of her figures have a wistful, enigmatic look or smile, reminiscent of the Mona Lisa.  Audrey’s process includes drawing portraits prior to her stitching and even drawing at the end of a day of stitching as a critique of her work or to an express an idea to develop in the future.

"Beach Woman" by Audrey Walker 1996, approximately 36" h x 28"w. 

“Beach Woman” by Audrey Walker 1996, approximately 36″ h x 28″w.  The larger-than-life size was to be suggestive of ‘heroes’.

Embroidery detail from "Beach Woman" by Audrey Walker 1996.

Embroidery detail  from “Beach Woman” by Audrey Walker 1996. Machine and hand stitched.

It’s remarkable to see the incredible detail that has gone into each of these large pieces.  The images are created through color blending with the threads.

“There is no doubt that building up an image with absolutely separate lines of colour – the threads – is an endlessly fascinating and pleasurable activity.  But it can be infuriatingly slow and it has all kinds of hazards! …However, the very slowness of the process can be productive.  It allows a longer encounter with the idea and therefore the chance to explore it more fully and critically.  It offers opportunities for valuable interludes – for instance setting a large piece on one side for a time in order to work through related thoughts on a smaller scale or in a different medium.  The prooblems in the larger piece are often solved through side-stepping into related work.”  (Audrey Walker ‘Insights’, 1999.)

"Encounter" 1998 by Audrey Walker approximately 36 h x 54" w.

“Encounter” 1998 by Audrey Walker approximately 36″h x 54″ w.  Originally intended as two separate pieces, Audrey reworked the piece through drawings and small embroideries to overlap the images.

Detail of hand-stitched eye from "Encounter" by Audrey Walker 1998.

Detail of hand-stitched eye from “Encounter” by Audrey Walker 1998.

Audrey was a regular participant in the “62 Group” exhibitions from 1966 – 1981.  Starting in 1962, the 62 Group of Textile Artists was created as support for serious professional textile artists.  Audrey joined in 1964 and remains an Honorary Exhibiting member.

"Observed Incident" by Audrey Walker 2002.

“Observed Incident” by Audrey Walker 2002. Approximately 28″ w x 60″ h (each panel). On loan from the Crafts Council.

Detail of knight's face with helmet and shield from "Observed Incident".

Detail of knight’s face with helmet and shield from “Observed Incident”.

Detail of "Still Life" by Audry Walker, 1993

Detail of “Still Life” by Audrey Walker, 1993

Inspired by a tiny embroidery fragment less than 2″ high at the Victoria and Albert Museum, Audrey created “Observed Incident.”  The 14th Century inspiration had 3 knights in full armor with a watching figure.  She wished to salute the unknown embroiderer’s imagination with a large scale version of the topic.

"Still-life" by Audrey Walker 1993 includes a tribute to Marandi, a master of still-life.

“Still-life” by Audrey Walker 1993 includes a tribute to Marandi, a master of still-life. Aprroximately 48″ w x 28″ h. On loan by Jan Beaney and Steve Udall.

"Stop and Smell the Roses" by Audrey Walker 2004.

“Stop and Smell the Roses” by Audrey Walker 2004. Approximately 14″w x 20″ h. On loan by Jean Littlejohn.

"Life is Just a Little Bowl of Cherries" by Audrey Walker 1984.

“Life is Just a Little Bowl of Cherries” by Audrey Walker 1984. Approximately 20″w x 15″ h. On loan by Jan Beaney and Steve Udall.  Ground is a tablecloth c 1935 to celebrate Audrey’s mother’s domestic embroidery.  One of a series on this theme.

Detail "Stop and Smell the Roses" by Audrey Walker 2004

Detail “Stop and Smell the Roses” by Audrey Walker 2004

Detail "Life is Just a Little Bowl of Cherries" by Audrey Walker 1984.

Detail “Life is Just a Little Bowl of Cherries” by Audrey Walker 1984.


"The Big Blue Bowl" by Audrey Walker 2013.

“The Big Blue Bowl” by Audrey Walker 2013. Approximately 24″w x 18″ h.

Detail "The Big Blue Bowl" by Audrey Wal;ker 2013.

Detail “The Big Blue Bowl” by Audrey Walker 2013.

The Big Blue Bowl is part of Audrey’s recent body of work where she is experimenting with a single line of stitch, rather than overlapping stitches.

Detail "The Garden" by Audrey Walker 2012.

Detail “The Garden” by Audrey Walker 2012.


"The Garden" by Audrey Walker 2012.

“The Garden” by Audrey Walker 2012. Approximately “52” w x 48″ h.

"Early Landscape" (1960's) by Audrey Walker.

“Early Landscape” (1960’s) by Audrey Walker. Approximately 24″ w x 22″ h. On loan by Jan Beaney and Steve Udall

"Gaze IV" by Audrey Walker 1999.

“Gaze IV” by Audrey Walker 1999. Approximately 14″w bottom; 11″ w top x 14″ h. On loan by Diana Springall.

Detail of Goldwork in "Gaze IV" by Audrey Walker 1999.

Detail of Goldwork and Embroidery  in “Gaze IV” by Audrey Walker 1999.

Christina Fairley Erickson with "Temptation (The Collectors)" by Audrey Walker 2004. Approximately

Christina with “Temptation (The Collectors)” by Audrey Walker 2004. Approximately 36″ x 36″ On loan by Diane & Marc Grainer, USA.

Once in a while you need to give in to temptation… as I did by going out of my way to make it to this exhibition.  I’m so glad I did!

UK Tour Day 1- Royal School of Needlework Curator’s Tour

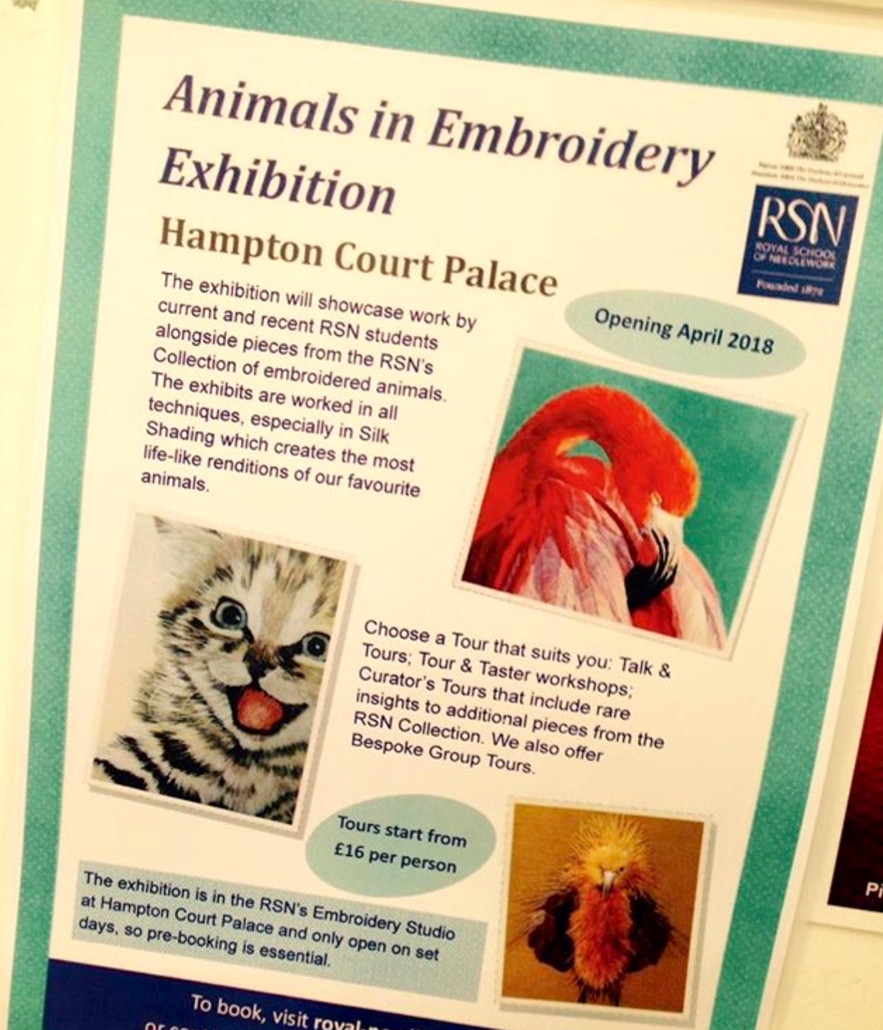
I’m a great admirer of England’s RSN and the incredible embroidery pieces produced by their students and tutors.  I’ve had the great fortune to visit them twice in the past, most recently in 2016 for theor Stumpwork and Raised Work exhibit.  So when planning my current tour, I looked up what is available and found their current exhibit is “Animals in Embroidery”- one of my favorite things to create!  Only problem was that the curator’s tour this month occured only at 11 am on the day I arrive from Seattle at 7 am!  I thought about it for several weeks and then decided I’d take the risk and sign up, even if timing was tight and I might miss it.  Luckily the stars must have been aligned because our flight arrived on time, we were successful with our train connections, and we met the RSN volunteers at the front ‘moat’ gate of Hampton Court Palace at 10:45 am.

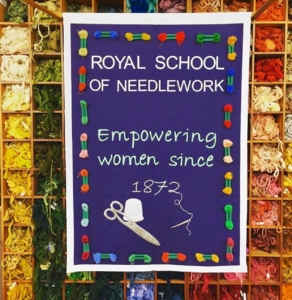
The Royal School of Needlework (RSN) started in the late 1800’s with Queen Victoria as their first patron.  Their mission has been to keep the art and techniques of hand embroidery alive and thriving, as well as helping train women (now men too) for employment so they can support themselves and not become destitute  They have classes at Hampton Court Palace and other International locations lasting from 1 day to several year programs.  They also have rotating exhibitions at their on site location, which can be viewed with a curator’s tour.  Book a tour at the Royal School of Needlework here!

According to our presenter who is inher second year of the RSN teacher certification program, animals  (including birds) are the second most common subject for embroidery (flowers are the most popular.) The display of both student and tutor work includes all sorts of techniques, tied together by the common theme of animals.  The techniques include blackwork, needlelace, goldwork, canvas, Jacobean crewel embroidery, whitework, applique, and silk shading.

One piece that caught my eye was a blackwork race horse and rider.  The stitches were so tiny- about 3 mm at the longest.  To create the shading/shadows, the density of stitch is increased, often by increasing the thread weight.  The jockey was done in blackwork techniques, but using colored threads to create contrast.  This exquisite piece was given to Her Majesty Queen Elizabeth II, on the occasion of her Diamond Jubilee in 2012.

Cards purchased at the RSN gift shop display a few of the lovely pieces from the “Animals in Embroidery” exhibit.

Silk-shading works beautifully as a technique for animals and birds, as you can make extremely realistic hair/fur and feathers with gradually blending the colors of very fine silk threads.  There are many true to life creatures in the exhibit using this technique including rabbits, leopards, chickens, badgers, yaks, flamingos, bats, owls and more!  Some might call this a photo- realistic style, but I think it’s so much more than a simple 2D picture.  You can’t get the range of texture in photography that you can in stitch.

From the 60,000 piece collection owned by the RSN, this banner has exquisite goldwork with 10 animals included. Can you find them all?

The tour moved then to their workroom where RSN trained embroiderers are working on commission projects.  These include both conservation work (repairing historic embroidery to stop the ravages of time) and new bespoke pieces.

As a final treat, we got to the RSN giftshop, where I picked up a few goodies.  After flying 9 hours and staying awake through planes, trains and automobiles, we headed back to our hotel in London, to get a well-deserved rest before a late dinner.

If you’re planning a trip to London, make sure to look up the RSN and see if you can take a class or tour.  You’ll be glad you did!

The front “moat” entrance of Hampton Court Palace


Actress in period costume working on blackwork embroidery in Hampton Court Palace.

Looking at the back side of the palace (where the school is located).

Magazine I purchased at the RSN store a out the history of the RSN since it moved to Hampton Court.

Second magazine on ecclesiastical embroidery.

New book I found at the RSN store… looks fabulous! A sweet memory to take home and inspire my own projects.

Christina standing below hand-dyed
embroidery threads

I’m back from five days in “stitch heaven” with Gail Harker.  The class, “Experimental Hand Stitch” focuses on Procion MX dyeing of embroidery thread and a wool/acrylic felt to stitch on, and then learning some of the basic embroidery stitches and how to use them in a contemporary context.

My friends”, Debbie and Rebecca, dyed felts and threads

The felt and threads are vibrant and beautiful.  Gail feels that having your materials inspire you is important, so she helps her students understand their color choices and combinations to be successful with the dyeing process.

Some of my dyed felts and threads

I basically stuck with an analogous color scheme from yellow-green through red-violet.  If you’re unfamiliar with analogous color schemes, it means that you pick colors that are adjacent to each other on the color wheel.  So the colors I worked with were greens, blues, and violets.

After our dyeing days, we started doing small stitch samplers.  Each stitch will have its own page in a small stitch book (we even learned how to bind our books!)  We also worked on documenting our samples within a sketchbook, including what threads we used, any observations we have, needles that were chosen, etc.

Some of my incomplete pages with the sketchbook
documentation pages and sample threads

Some of our samples were also worked on sketchbook pages which we dyed and then fused together, so they are quite stiff.  We then poked holes in the sketchbook pages along the line which we wanted to stitch, and then added the stitch afterwards.  It was so fun… it reminded me of when I was a little girl and had cards with pictures on them and holes to “stitch” through (really it was more like lacing.)

French Knots (in process) by Christina Fairley Erickson

While none of these samples is complete yet, you can get an idea of what they’ll look like here.  I have additional ones started, but these are the most complete.  The other thing which was different and interesting was the freedom which we were encouraged to take with each piece.  For instance, in years past, French knots were expected to have the thread wrapped neatly around the needle two times.  With contemporary hand stitching, however, we can make a variety of sizes and different textures and effects by wrapping a thread more times around the needle, or by wrapping it loosely, rather than tight.

Running Stitch (in process) by Christina Fairley Erickson

Seed Stitch (in process) by Christina Fairley Erickson

Blanket Stitch by Christina Fairley Erickson

Open Chain Stitch (in process) by Christina Fairley Erickson

Each of the pages is about 5″x 7″, so they fit in well with my 5 x 7 Challenge!  I’ll be getting my final Salsa piece finished up this week, then I’ll need to work on the sashing and binding of all the Salsa blocks into a finished quilt.

You Might Also Be Interested In:

Dyeing to Embroider; Recognizing our Limits 
& Not Giving Up
Hand Stitch Variations

Check Out these other Great Blogs:

Anything Goes – Quilt ‘n Sew at Stitch by Stitch

Freemotion by the River

Quilt Story

Wow… another fantastic day of mostly working with Procion MX dyeing at the Gail Harker Center for Creative Studies.  To be completely honest, I’m pretty tired… this can be hard work.  So, I’m going to keep it short and sweet tonight, and just put up some images and descriptions of the processes and projects we worked on.

First, our hand-dyed embroidery threads are totally luscious!  Here they are drying in our classroom.  We had to rinse them out and then set the color in hot water with Synthropol today.

We then started dyeing wool-rayon felt, which we’d cut into pieces prior to class, and will be making into hand-stitched books.

Felt with dye poured on (wet)

The felt totally soaks up the dye… you have to pour it on and it looks horrible and dark for the most part.

Rinsing out the felt

After allowing it to sit for a few hours, we rinsed it out and also set the dye with Synthropol.  Since the felt soaks up so much water, we had to carefully wrap it in towels to help dry it.  You don’t want to press or agitate it very much, or it starts the felting process.  We then left it to completely dry overnight.

Felt dyeing

Rinsed felt for hand-made stitch books, laid out to dry

We also worked with painting dyes on sketchbook pages.  We do these in 2-page “spreads” so that they will go together when the book is opened.  We then fuse pages together, to make the pages stiff and able to be stitched on.  We started working on a few pages by drawing a design on them, then punching holes through the paper with a darning needle.  We then can easily put our stitches through the holes.

Some sketchbook pages painted with dye

I believe we’re done with the dyeing now… on to more stitchwork tomorrow!

A two-page spread for a sketchbook, painted with Procion MX dye

  You Might Also Be Interested in:

New 5 x 7 
Challenge Pieces
Complex Threads 2 Developing the 
Creative Habit

Check out these other Great Blogs!
For great ideas on freemotion quilting, check out Leah Day’s FreeMotion Quilting Project

I spent the day literally dyeing to embroider… yes, I am anxiously awaiting getting down to stitching, but I mean “dyeing” with an “e” in it.  Rather than using all commercially available embroidery floss, we spent the day making our own threads, for the first of 5 days in “Experimental Hand Stitch” at the Gail Harker Center for the Creative Arts in LaConner, WA.  I’ve always salivated at the yummy colors of hand-dyed threads.  Now I know how to make them!

First, we had to prepare the skeins of thread.  There are two main types of embroidery thread, pearl (or perle in French) cotton which is a twisted cotton and cotton floss (also known as 6-stranded cotton.)  Pearl cotton comes in many different thicknesses: 3, 5, 8, 12, and 16, with 3 being the thickest and 16 being quite delicate.  Six-stranded cotton is literally that, 6 strands that you can separate, depending upon how thick a piece you want for your project.  Of course there are many other types of threads or yarns you can use for embroidery and any natural fiber will work for dyeing (silk, rayon, bamboo, etc.)  We have several unusual yarns and threads as well as the pearl cotton and cotton floss.

To prepare for dyeing, we had to get the thread into skeins (some of it came on balls or rolls that we had to wind into a skein) and then tie the skeins about every 12 inches (30 cm), to make sure it wouldn’t get tangled up.  We used a figure 8 tie with a square knot, tight enough to hold the skein in place, but not so tight that it would cause a resist and have the thread not take up the dye underneath the tie.

As with any Procion MX dyeing, we then soaked our threads in a soda ash solution, so that the chemical bond would occur in the fiber when the dye  is introduced.

The next step was to use a syringe to “paint” the colors on the thread.  As you inject the dye onto the thread, you then need to smoosh it down to ensure that it is completely saturated, particularly wherever the ties are.    I chose to mainly go with an analogous color scheme from yellow-green, to green, to blue-green, to blue, to blue-violet, to violet.  With sticking to one color scheme, I can be assured that my projects using these dyed threads will go together.

When all the dye is on the threads, you carefully roll the threads up in plastic (see red arrow) and then leave it overnight to process.  I can’t wait to see them in the morning!

My Mom, Nan Lopis, working
on her dyed threads

The best thing of all… my Mom has joined me for the 5 day class at Gail Harker’s!  I was concerned that the dyeing might not be something she’d enjoy (she’ll love the hand-stitching), but she came through like a champ, and made a lovely yellow-olive-greens colorway of threads.

Note: all the threads in the photos above have wet dye on them.  The colors will change somewhat upon the dye setting and washing them afterwards.  One of my favorite parts of dyeing is when you unwrap it the next day and wash it out… it’s like getting a present!

You Might Also Be Interested in:

Making Fabric More Embroidery Samples How to Make a 
Knotted Blanket Stitch 
Video Tutorial

I’ve been continuing to explore hand-stitch this last week and completed another sampler.  I’m not really sure where I’m going to be using this in my work this year, I’m just certain that I am.  I’ve seen so many spectacular pieces that were enhanced by using hand-stitch.   I’ve also noticed that show judges seem to appreciate the extra effort that an artist has put in, when there are hand-stitch elements.  Here are the stitches (on acrylic felt- not hooped):

Top row:

  1. Double Knot Stitch (aka Old English knot, Palestrina or Smyrna Stitch)
  2. Cable Chain Stitch.  This is like chain stitch, but with a link in between the chains
  3. Fern Stitch (aka Fern Leaf Stitch)
  4. Paris Stitch (aka Open Square Stitch)
  5. Fence Stitch (aka Bosnian Stitch)
  6. Tnorn Stitch
  7. Cross Stitch (aka Berlin or Sampler Stitch)
  8. Braid Stitch
  9. Singalese Chain
  10. Wheatear Stitch
  11. Fishbone Stitch (on leaves)

Bottom row:
  1. Whipped Backstitch
  2. Threaded Backstitch
  3. Double Threaded Backstitch
  4. Chain Stitch with Backstitch running through center
  5. Double Knot Stitch
  6. Petal Stitch
  7. Scroll Stitch
  8. Ladder Stitch
  9. Long Armed Cross Stitch
  10. Vandyck Stitch (aka Flat Variable Stitch)
  11. Long & Short Stitch (top leaf in oranges)
  12. Stem Filling Stitch (bottom leaf in blues)

I’m partially doing this work as I’m taking another hand-stitch course at the Gail Harker Center for Creative Arts in March.  I’m looking forward to getting more ideas in how to incorporate the hand stitches into my work.

Speaking of Gail’s classes, this Thursday, Jan 10 from 5-8 pm, the opening of “Complex Threads: Students of Gail Harker Center for Creative Arts” will be happening at the Schack Art Center in Everett WA.  If in the area, be sure to check it out!

You might also be interested in:
How to make a knotted blanket stitch (video)
More embroidery samples
Stitchwork Samplers

Christina  in Winter White Cape
at Snowflake Lane

Randy and I finished up our shopping at Bellevue Square where they have “Snowflake Lane” each night during the holidays. He’s now entertaining us playing an assortment of Christmas music, Broadway show tunes, and pieces from the 20’s to the 50’s. I’m at a distinct disadvantage with “Name That Tune” for that era, since I wasn’t even born yet, but my Mom is having a great time!

Snowflake Lane

Knotted Blanket Stitch

Since I always like to keep my hands busy, I’m working on an edging stitch for one of my embroidery samplers. I decided to do a Knotted Blanket Stitch, which I’ll show  how to do here:

Step 1- Make a loop
Step 2 – Needle through loop and
above the lower thread from last stitch

Step 3- Pull loop tight around needle
Step 4 – Pull thread through, making
sure that loop stays tight to form knot

You might also be interested in:
Stitchwork Samplers
More Embroidery Samples

Merry Christmas from our family to yours and wishing us all Peace on Earth.

Christina

I’ve spent some evenings working more on hand embroidery.  Let me know if you want instructions or thread types on any of the stitches!

Top Row:

  1. Herringbone stitch
  2. Herringbone stitch
  3. Cretan stitch – similar to herringbone, but with a twist
  4. Cable stitch
  5. Laced running stitch – simple but looks nice!
  6. Pekinese stitch – while this isn’t very difficult, you need to work at keeping loops the same size
  7. Laid trailing stitch – very thick raised couched cording
  8. Feather stitch
  9. Heavy Chain stitch- this is almost a braided stitch
  10. Twisted Chain stitch
  11. Chevron stitch
  12. Open chain stitch -this fine wool (DMC Medicis) is a bit tough to see- looks like a ladder
Bottom Row:
  1. Double Chain stitch
  2. Feathered Chain stitch – nice vine-like look
  3. Crested Chain stitch
  4. Top: Rosette Chain stitch  Bottom: Buttonhole Wheel
  5. Two Color Chain stitch – this is done with two threads in your needle, but just catching one each stitch
  6. Rope stitch
  7. Raised Stem stitch
  8. Blanket stitch
  9. Whipped Blanket stitch
  10. Long & Short Blanket stitch
  11. Closed Blanket stitch
  12. Up & Down Blanket stitch – make a nice little knot along with two strands to side

While I currently define myself as a “fiber and mixed media artist”, I struggle with the definition. I started early on as a seamstress,then as a costume designer. I moved to being a quilter for a short while, then specialized in art quilts. I’ve played around with many styles, but basically feel my niche is in representational art.

When I started falling in love with making my own fabric, I became a surface designer.  But, I was still pretty wrapped up in using my fabrics in my quilts.  Now, I’m moving even more to embroidery.  Whether it’s dense machine embroidery, thread painting, intricate machine quilting, or hand work, stitch seems to give me a tactile grounding that no other medium has for me.  But how do I define myself?  Where does this work fit in?

I know that most shows that are quilt-centered are very strict about their definition of a quilt… 3 layers connected with stitch, often needing to be professionally bound in some way.  If I decide to create a stitched piece and stretch it over a frame or canvas, then it won’t qualify.  So the question is, how important is it to me to fit into the categories that show producers have come up with?  Or even, how important is it to me to continue to exhibit?  Is it more important to create and then find the right niche for my creations, rather than creating to fit particular guidelines?

While I don’t feel like I have a strong enough discernible style or large enough body of work to go into solo shows, I do enjoy having my work out in front of the public.  The question is, will work that is not formally a “quilt” get accepted into shows?  Do I feel I need to break out of confines of being defined as a quilter?

I don’t know that I have the answer for that yet.  Maybe as I work out my goals for the upcoming year, it will become more clear to me.  How do you define yourself?  I’d love to hear your thoughts!

Quick tip for productivity:  I recently found the iPhone app “Evernote“.  This is a way to organize all your notes, including Word docs, Adobe Acrobat PDFs, and simple text inputs.  You can also use it online or download a version to your computer, as well.  They all sync together. You can organize notes into notebooks (so I have one notebook for my studio, one for family, one for my blog, etc.) and put as many items within each notebook as you want.  It’s a great tool!