It’s hard to believe that we’re almost at the middle of March… almost 1/4 of the year is done! However, with that in mind today, I thought I should review and see how I’m doing on My Goals for the year.
 |
| “Best Friends” by Christina Fairley Erickson Commercial and artist hand-painted cottons, machine applique, machine free-motion quilting |
 |
| “Best Friends” detail by Christina Fairley Erickson |
 |
 |
 |
 |
| Complex Threads 1 | Complex Threads 2 | Artistic Goals 2013 | 2013 Artist 5 x 7 Challenge |
 |
| Dharma’s Retail Store in San Rafael, CA |
I’ve purchased many supplies at Dharma Trading Co. over the last few years. So, when I found out that Dharma has a retail store in San Rafael (about 45 minutes outside of San Francisco, where I’m visiting), I decided to make a trip. If you haven’t visited their website, they have almost anything and everything that you could need to dye, paint or do surface design on fabrics.
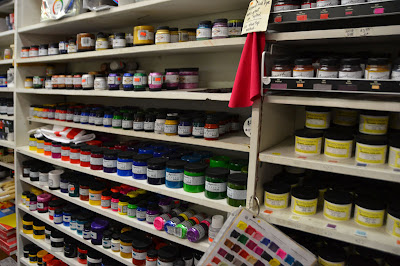 |
| Fabric Paints |
The one thing that you will find at Dharma’s retail store that they don’t have on their website is a wonderful wide supply of incredible yarns. While I’ve so far been able to restrain myself from catching the knitting and crocheting bug, I do still love beautiful yarn. I like couching yarns for different effects.
 |
| Dye Supplies |
You can also purchase both silk and cotton garments (generally in white, but also in black and a few in other colors) to use for dyeing and painting. The prices are very reasonable, which makes them great for resale after you surface design on them.
 |
| Shiva Oil Paintsticks, Rubbing Plates, and Metallic Pigments |
 |
| Fabric Dyes and Paints |
 |
| Dye-na-flow and Dyes |
 |
| Custom Yarns |
 |
| Custom Yarns |
 |
| Custom Yarns |
 |
| Custom Yarns |
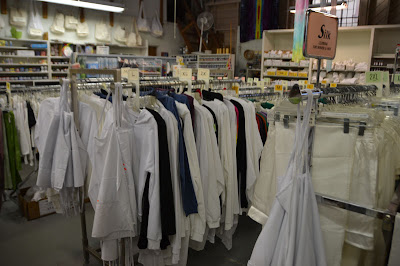 |
| Silk and Cotton garments that you can dye and paint |
 |
| Trees- 2 of my UFO’s that could use more paint and completion |
Now that I’ve seen all their wonderful products, I can’t wait to get back home to break out my dyes, paints and other supplies and finish up a few of my UFO’s, such as these trees. I have a few projects that I think that can be salvaged with a little overdyeing or adding some paint.
Hope you enjoy!
You Might Also Be Interested In:
 |
 |
 |
| Berkeley and San Francisco Fabric Excursion |
Recognizing Your Limits and Not Giving Up |
Developing the Creative Habit |
Check out Leah Day’s FreeMotion Quilting Project!
You might want to start with a little history and look at Designing for a Theme: Innovation Part 1.
 |
| Artist rendition of Graphene molecules |
With the topic “Fiber Artists Look at Innovation and Civic Action”, I personally decided to narrow down possibilities by choosing to represent innovation. Since I’ve always enjoyed science, I started with looking at scientific journals and find out what some of the recent innovations have been that are expected to revolutionize areas of our lives. This is where I found out about Graphene.
Graphene, a form of carbon only one atom thick and in a hexagonal cellular structure, is both the thinnest and strongest substance now known to man. Scientists believe it will revolutionize technology from computer and mobile displays, medical devices, aerospace, desalination plants, electronics and countless ways which we cannot yet predict. Since I’m a technology fan and my husband’s business is in aerospace, this seemed like a good place to start. If you want to see a really cool futuristic video, check out this short YouTube “Future Applications of Graphene.”
So now I had a topic to try to represent to go along with the theme… but what could I do with it? I decided I wanted to represent both the uniqueness of the material (thin, lightweight, hexagonal cellular structure) as well as some of the possible applications of the technology.
Another little aspect that I had to keep in mind was the unusual gallery space that this piece would (hopefully) be hanging in. The walls were mostly all a deep dark forest green (with a hint of teal) and a couple that were a bright spring green. Not exactly easy to hang anything on, but ok if you’re specifically designing for the backdrop color.
My idea was to have a thin sheer layer cut in a hexagonal pattern that would fiat above the quilt, which would be surfaced designed to tell more of the story. I started the quilted layer with white Pima cotton. I bought some plasticized wire garden fencing that had hexagons as its design, and started with placing it on top of the white fabric and spritzed jacquard Textile Paint through it. This created a resist, with a painted background (in blues and greens) with a shadowy faint white hexagonal grid.
 |
| Representation of a computer touch-screen made with a thermofax silkscreen and hand-painted shading |
I then created several black and white images from photos (using Photoshop) of things that will have future applications using graphene. These included a commercial airplane, computer circuit boards, a smartphone, and a computer touchscreen. I then turned these images into silkscreens using a thermofax machine. I layered these different images around on the background, using Versatex print ink. I added some hand painting and when the paints were all dry, I finished the back/quilt with a diamond grid pattern for the quilting, as well as freemotion elements around each of the special elements.
 |
| Silkscreened computer circuit board with gold metallic thread freemotion quilted to look like metal elements. |
Now it was time to figure out how to represent the one-atom thick sheets of this hexagonal carbon molecule. I knew I wanted to have it be somewhat sheer (and black, since it is carbon, after all.) I thought that using a black organza might get the effect I wanted, so I bought some of each silk, rayon, nylon and polyester organza to test. I had a couple of different ideas on how to cut out a grid that wouldn’t ravel and could hold up, yet not be too terribly difficult or end up too uneven.
 |
| Some of my samples testing different organzas and ways to cut and make sure they wouldn’t fray |
The most consistent method and material turned out to be painting the nylon organza with matte medium, drying it, and cutting out the interior hexagons with small, sharp scissors. I’d been a bit surprised by this, thinking that a hot knife might cut and melt a synthetics edges at the same time, but it proved to be more difficult and harder to be exact than using my small Kai scissors. Also, I tried treating with different products with varying degrees of success. Some items made the organza too stiff (I wanted it still to be able to move in a breeze, to demonstrate the thinness of the graphene); others, like Fray Check, left a shiny plastic-like coating.
 |
| Close-up of grommet, copper pipe & bead hanging mechanism |
 |
| The organza hanging |
You can imagine the time it took me to cut out each of the little hexagons on the finished piece! The next step was to figure out how to affix the top layer so it would hang out separately from the quilted back piece. This turned out to be quite tricky. After many trials and errors, I was able to get a decent effect using some heavy-duty grommets, 1/8″ copper piping, copper wire, and beads.
Thankfully, my efforts were rewarded by the jury and my piece was accepted into the show! Here is the final piece, hanging at the Seattle Center Next 50 Exhibition! I particularly like how the hanging grid creates such interesting shadows with the gallery lighting. The only disappointment to me was that the show chair who mapped out where each piece was to go, choose to put my piece on one of the couple spring green walls, after I’d designed it to go on the dark green ones! Well, you can’t control everything!
You might also be interested in:
 |
 |
 |
| Designing for a Theme… Innovation Part 1 |
Designing for a Theme | Journeys Show at SeaTac Airport |
Between link parties from WIP (work in progress) Wednesdays at Freshly Pieced and Freemotion Fridays on the Freemotion Quilting Project, we’ve got a great start in generating interest in the 5 x 7 challenge for 2013!
 |
| Hand-painted and block-printed fabrics and papers by Christina |
I’ve been struggling with how to juggle getting a project done while designing and/or conceptualizing one or more others. It’s not like I don’t do this all the time in my everyday life… What woman doesn’t? Even my studio has a minimum of 4-5 things going at a time-some on the design wall, others in various states of completion. But when you come down to a commitment to produce a finished product each week, my stomach gets a bit tight, I wonder if I’ll be able to persevere throughout the year, and I feel a bit frantic about wanting to work ahead and get a bunch done, so that if things come up, I won’t end up with nothing to show for the week. But that seems a bit off-target. After all, the idea is to learn to consistently produce art, right?
 |
| Christina’s gradation run of sunshine yellow Procion MX dye |
So, I’m taking a deep breath and thinking about how I’m going to do my next piece. I also think that I’ll allow myself to work on design ideas in my sketchbook, which I can then decide whether I want to produce in a more finished form at a later date. But I won’t actually have more than the current week and the coming week’s projects in any phase of production.
What I’m wondering is what would be the best way to balance getting my “other” projects complete. After all, I do have other goals for 2013 which I need to make progress on. I didn’t even put in additional time for dyeing and surface design in my goals, nor did I mention any of the pieces I have in various stages of completion, other than a vague mention of “ramping up my pictorial quilts” and having a couple pieces completed to enter in various shows.
As an example, in a little less than two weeks, my small art-quilt group (the Fiber Funsters) has our next meeting where we reveal our second challenge quilt. (Details about this challenge are posted on my blog post “The Fiber Funsters 10×16 Group Challenge.”) The current challenge is based on the word “Celebrate.” It seemed appropriate for the holiday season and I had hoped to incorporate something which would work both for this theme and “Salsa!” the theme of the CQA Mighty Tieton show coming in early summer. However, it just didn’t really work for me. I designed a piece using photos from a cathedral door with a chili-pepper wreath on it, but when it was shrunk down to 10″ x 16″, it just didn’t work for me. I may still create that piece in a larger format for the Salsa show, however. So, now I’m working on something more abstract and playful with my hand-dyed and painted fabrics. With time running short, I’m going to have to get a lot of time in behind my sewing machine this weekend!
 |
| Hand-painted and block-printed fabrics and papers by Christina |
Realistically, what I’m talking about is time management. With my background in business, I understand and can get focused when I think about it in this way. I can schedule my sewing sessions, make a timeline for when I have to get things complete, and have to-do lists for each step of each project. The main thing is not to get mired down in the daily muck of being run by your plans and schedules. That, after all, doesn’t really allow for free-flowing creativity. However, it can be very useful for managing showing your artwork and possibly for getting more accomplished (I haven’t really tried it for managing my work in the studio.)
How do you manage your time, projects and priorities? Do you work on one project or many?


