Today was a fairly low-key day.  I’m trying to go along with Leah Day’s Freemotion Quilting Project focus on UFO’s each Sunday.  Today her FMQP blog post discusses getting negative reviews online.  I guess I’m kind of shocked.  I feel like Leah has given such a wealth of knowledge out for free and that she does a beautiful job.  Please stop by and give her some positive comments (if you haven’t seen her blog before, you really need to check it out!)

Back to UFO Sunday, here is the UFO that has been on my wall without progress for 6 months.  It’s a color progression with a contrasting curved piece through each block.  Although I don’t normally do block-based quilts, I wanted to practice some simple curved piecing and started on these 8″ squares.  I kind-of ran out of space on my design wall however and obviously haven’t finished up the curves in all the blocks I have up yet.

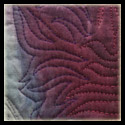
My thought has been to sew 1-2 vertical rows together at a time and then quilt them in those rows, putting the whole quilt together after doing the quilting.  I’m still struggling a little with how you put the quilt together after quilting, but want to try it out, since I hopefully have quilted my last king-sized quilt on my home machine after it was all pieced!  I’m thinking that using Leah Day’s “Mesh Curtain” pattern for the long vertical rows.

So, my commitment is to make some progress this week with this quilt, before the next UFO Sunday!

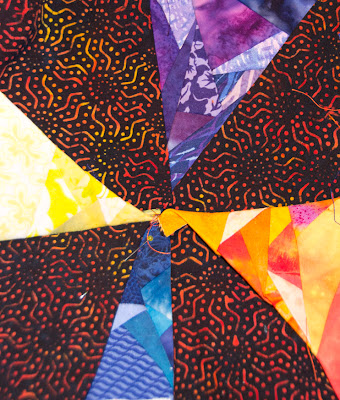
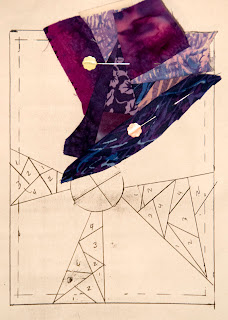
The other piece I’ve worked on today is my second week’s 5 x 7 Challenge piece.  I completed the paper piecing and now need to aapplique the center circle and rungs of the windmill blades, before I can start quilting it.

Beyond my indoor projects, my husband Randy and I, along with our two boys Ryan and Coleman and our dog Dexter, went for a winter’s walk at Marymoor Park in Redmond.  It was about 30 degrees and the frost twinkled on the trees and shrubs.

Reflections on the water
Partially frozen stream through the marshlands
Ice and frost in marsh grasses
Beautiful winter light and reflections
Christina with sons Ryan (left) and Coleman
(right) and Dexter (with the long ears)

Husband Randy with Dexter

Golden Hour at Penn Cove 
& Monet’s Haystacks
What I Want My Children 
To Know
Sunshine and Sand 
Design Inspiration

Today turned out fantastic at our CQA meeting!  We had the following stations for making surface-designed fabrics to contribute to Stashfest:

Christina Fairley Erickson (me!): Shiva Oil Paintstick Rubbings, Stencils, Fabric Markers and Tsuneko Inks
Cameron Mason: Mono-printing with thickened dye
Colleen Wise: Thermofax silkscreening and foiling
Peg Swartzman: Oil Paintsticks with resists and stencil brushes
Kathy Cooper: Printing with Print blocks

Peg Swartzman teaching how to use Oil Paintsticks with
Freezer paper resists and stenciling brushes for an
elegant gradient effect

Cameron Mason (far right) teaching mono-printing with
thickened dyes to Roslyn Duffy (left) and Roberta Andreson (center right)
Roslyn Duffy’s mono-print with thickened dye
Flora Dalglish making Shiva oil paintstick
rubbings at Christina’s station

Debbie Babin designing with fabric markers after adding oilstick rubbings
at Christina’s station
Barbara O’Steen (left), Barbara Kanaya (center) and Debbie Babin (right)
working at Christina’s stenciling, fabric pens, and oil stick rubbing station
CQA President Marylee Drake (foreground) doing
Thermofax screen printing with Colleen Wise (background)
Some of our finished packets of fabrics to sell at Stashfest
We labeled each packet with the artist’s name who made the fabric(s), size(s),
and the processes used on each piece.


Stashfest Creator and CQA Member, Patricia Belyea
measured the fabrics and helped bundle them for sale

Want the chance to buy some of these wonderful fabrics?  Come to Stashfest April 6 and 7 up in LaConner!

You might also be interested in:

Making Fabric Viewing for Inspiration Making Fabric

Sketched in pencil first from a photo, then traced to
fabric and thread sketched by Carol

First, I want to share Carol’s first 5 x 7 Challenge piece. Check out Carol’s blog: LandscapeLady – Art Quilts from Vermont.  I think she’s done a wonderful piece and is working on a fantastic quilt of a dog in the style of David Taylor.

I recently saw a couple of David’s quilts at the Material Men show at the LaConner Quilt and Textile Museum.  They were truly breathtaking, at least for those of us who love pictorial / representational quilts.  The show featured 16 male quilt artists… not just because they are men, but because they are also exceptional artists.  I brought my husband and sons along to this exhibit and my husband was particularly intrigued with how he felt the men expressed themselves differently in the quilt medium than women do.  Some was thematic, some was stylistic, and some just gave a different impression or vibe than you might see at your local quilt show.

This evening I’m packing up my truck to bring a slew of surface design materials to the CQA meeting tomorrow morning.  We’re having a surface design party to make fabric to sell at Stashfest, a fundraiser for the LaConner Quilt and Textile Museum.  I made some last month with a few friends (see Making Fabric) and suggested to the group that we do it as a big group activity this month.  We’re going to have stations with thermofax silk-screening  Shiva oil paintsticks and rubbing plates, stencils with fabric markers for drawing and Tsukineko inks, foiling, and mono-printing with thickened dye.  We should have a wonderful assortment of fabrics to sell in April.

As part of my contribution to Stashfest, a tour of my studio will be up for sale!  Call “Stashfest Insider Visits” people can purchase tours of many different artist’s studios.  I’ve been working on studio organization, so now I’ll have to get really serious!

Last bit for this evening… I started a Fiber Artist Journey Facebook group, where we can also share photos and discussions.  Please click the link and “Like” the group to stay in touch!

You might also be interested in:

Making Fabric Viewing for Inspiration CQA Surface Design Party

You might want to start with a little history and look at Designing for a Theme: Innovation Part 1.

Artist rendition of Graphene molecules

With the topic “Fiber Artists Look at Innovation and Civic Action”, I personally decided to narrow down possibilities by choosing to represent innovation.  Since I’ve always enjoyed science, I started with looking at scientific journals and find out what some of the recent innovations have been that are expected to revolutionize areas of our lives.  This is where I found out about Graphene.

Graphene, a form of carbon only one atom thick and in a hexagonal cellular structure, is both the thinnest and strongest substance now known to man.  Scientists believe it will revolutionize technology from computer and mobile displays, medical devices, aerospace, desalination plants, electronics and countless ways which we cannot yet predict.  Since I’m a technology fan and my husband’s business is in aerospace, this seemed like a good place to start.  If you want to see a really cool futuristic video, check out this short YouTube “Future Applications of Graphene.”

So now I had a topic to try to represent to go along with the theme… but what could I do with it?  I decided I wanted to represent both the uniqueness of the material (thin, lightweight, hexagonal cellular structure) as well as some of the possible applications of the technology.

Another little aspect that I had to keep in mind was the unusual gallery space that this piece would (hopefully) be hanging in.  The walls were mostly all a deep dark forest green (with a hint of teal) and a couple that were a bright spring green.  Not exactly easy to hang anything on, but ok if you’re specifically designing for the backdrop color.

My idea was to have a thin sheer layer cut in a hexagonal pattern that would fiat above the quilt, which would be surfaced designed to tell more of the story. I started the quilted layer with white Pima cotton. I bought some plasticized wire garden fencing that had hexagons as its design, and started with placing it on top of the white fabric and spritzed jacquard Textile Paint through it. This created a resist, with a painted background (in blues and greens) with a shadowy faint white hexagonal grid.

Representation of a computer touch-screen made with a
thermofax silkscreen and hand-painted shading

I then created several black and white images from photos (using Photoshop) of things that will have future applications using graphene. These included a commercial airplane, computer circuit boards, a smartphone, and a computer touchscreen. I then turned these images into silkscreens using a thermofax machine. I layered these different images around on the background, using Versatex print ink.  I added some hand painting and when the paints were all dry, I finished the back/quilt with a diamond grid pattern for the quilting, as well as freemotion elements around each of the special elements.

Silkscreened computer circuit board with gold metallic
thread freemotion quilted to look like metal elements.

Now it was time to figure out how to represent the one-atom thick sheets of this hexagonal carbon molecule. I knew I wanted to have it be somewhat sheer (and black, since it is carbon, after all.) I thought that using a black organza might get the effect I wanted, so I bought some of each silk, rayon, nylon and polyester organza to test. I had a couple of different ideas on how to cut out a grid that wouldn’t ravel and could hold up, yet not be too terribly difficult or end up too uneven.

Some of my samples testing different organzas and ways to
cut and make sure they wouldn’t fray

The most consistent method and material turned out to be painting the nylon organza with matte medium, drying it, and cutting out the interior hexagons with small, sharp scissors. I’d been a bit surprised by this, thinking that a hot knife might cut and melt a synthetics edges at the same time, but it proved to be more difficult and harder to be exact than using my small Kai scissors.  Also, I tried treating with different products with varying degrees of success.  Some items made the organza too stiff (I wanted it still to be able to move in a breeze, to demonstrate the thinness of the graphene); others, like Fray Check, left a shiny plastic-like coating.

Close-up of grommet, copper pipe
& bead hanging mechanism
The organza hanging

You can imagine the time it took me to cut out each of the little hexagons on the finished piece!  The next step was to figure out how to affix the top layer so it would hang out separately from the quilted back piece.  This turned out to be quite tricky.  After many trials and errors, I was able to get a decent effect using some heavy-duty grommets, 1/8″ copper piping, copper wire, and beads.

Thankfully, my efforts were rewarded by the jury and my piece was accepted into the show!  Here is the final piece, hanging at the Seattle Center Next 50 Exhibition!  I particularly like how the hanging grid creates such interesting shadows with the gallery lighting.  The only disappointment to me was that the show chair who mapped out where each piece was to go, choose to put my piece on one of the couple spring green walls, after I’d designed it to go on the dark green ones!  Well, you can’t control everything!

“Graphene: The Miracle Material” by Christina Fairley Erickson
Whole-cloth 100% cotton background quilt hand-painted, silk-screened and machine quilted by artist.  Upper layer nylon organza treated with matte medium and cut into hexagonal grid attached with copper pipe, copper wire, beads and metal fittings by artist.

You might also be interested in:

Designing for a Theme… 
Innovation Part 1
Designing for a Theme Journeys Show at 
SeaTac Airport
Original sketched design

New week, new project. Well, actually one completely new, one just finished, and another in process. First, I started my next 5 x 7 Challenge piece, which I had sketched out last week.

Paper-piecing pattern

In thinking about how I could most effectively make this, I decided that paper-piecing would probably be the quickest with a nicely finished result. Since most of my art isn’t geometric, I haven’t had a lot of practice with paper-piecing.  

First section completed

This is where those of you who are familiar at this skill will probably laugh.  When you look at my pattern to the left, I have had to build each section with numbering.  However, I’m having to build parts of the sections on separate papers and then combine them, as my lines don’t all match up.  It’s seeming to work however.

“Opening” by Christina Fairley Erickson
100% Freehand Machine embroidered and Freemotion Quilted

I also just completed my first piece for the Fiber Funsters 10 x 16 challenge. Guess I’m all about the challenges this year! finishing off this dense freehand machine embroidery was more difficult than I expected. I decided to do a trap unto effect with a second layer of batting inside the lily, to have it stand out from the background. I then added the backing and freemotion quilted around the flower and in uneven horizontal lines over the blue background. Of course, I realized after doing a good portion that I could have just as well quilted from the back side since the flower was already outline, which would have made it possible to have even spacing of the lines. As it turned out, I couldn’t distinguish my quilting lines from all the thread of the background, which makes it a little less precise when you view from the back side.

“Opening” back – faced and freemotion quilted
See the white
on the edge?
The real difficulty came when I faced the piece and tried to turn the facing to the back. With such dense stitching, it was remarkably stiff and didn’t want to gracefully bend and hide the facing. Also, the process stressed it a bit and little bits of the white under-fabric were showing through.


The edge after painting
with fabric markers
See the difference/?
Well, I steamed and starched and pulled and cajoled, stay-stitched the seam allowance to the facing, and cut away as much of the seam allowance as possible.  I hand stitched the facing down, but still wasn’t fully satisfied with the result.  In the end, I dug out some fabric markers and ‘painted’ the edges and little white spots that shouldn’t be showing!  I think it did the trick!


My final piece to share is the second quilt for Fiber Funsters.  The word we’re using this time is “Celebrate!” as our theme.  I’m not sure what I think of this piece yet or if it has any promise.  I played around with some fabrics I’d hand-dyed and painted and this is how far I’ve gotten.  I don’t really know how I’m going to free-motion quilt it yet… But it’s supposed to be done in a week, so that gives me a little motivation!

“Celebration” – work in progress by Christina Fairley Erickson

You might also be interested in:

52 Weeks of Art The Fiber Funster’s 
10 x 16 Group Challenge
2013 Open 5 x 7 Challenge


Blogs You Should Check Out!
For Fantastic Tutorials on FreeMotion Quilting go to The FreeMotion Quilting Project
Work in Progress Wednesday (Thanks Freshly Pieced!),
Link it Up Thursday  (Thanks Seven Alive!) and
 Can I Have a Whoop Whoop (Thanks, Confessions of a Fabric Addict!)
Off the Wall (Thanks Nina Marie Sayre)
TGIFF (Thanks Diane – FromBlankPages!)

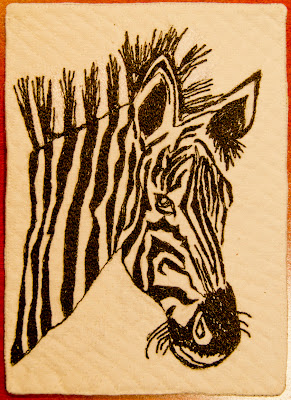
For my first week of the 5 x 7 Artist Challenge, I completed a little freehand machine-embroidered piece that I’ve been thinking about for some time.

Freehand machine embroidered and quilted by
Christina Fairley Erickson

This zebra was adapted from a photo, drawn onto the fabric with pencil, then stitched on top.  It’s difficult to see in this photo (see enlargement below), but his mane has white stitching between the black parts, although I didn’t stitch the white over the rest of him.

My choice of fabric is all cotton, with an interesting weave (again tough to see in the photo)- nubby- sort of like raw silk.  This proved to be a factor in choosing the background quilting, as when I made some practice samples using different freemotion quilting designs, it seemed to look best with a more geometric style, rather than one that has lots of swirls or undulating pattern.  I think the grid works well to not compete with the main focus of the zebra.

Close-up of stitching.

I think the piece works for me… it was good practice both with the machine embroidery and the small-scale quilting.  The zebra is a natural extension of my equine quilts and passion.

Tomorrow I’ll finish up my story of the quilt show theme: “Fiber Artists Look at Innovation and Civic Action.”

Hopefully we’ll have a few other photos to post on our 5 x 7 Artist Challenge as well.  Remember, you can join at any time.  Post your photos to: http://www.flickr.com/groups/5x7_artist_challenge/

You might also be interested in:
2013 Open 5 x 7″ Challenge
Getting Started May be the Hardest Part
52 Week 5″ x 7″ Challenge to Readers

Other Blogs You might want to check out:
Freemotion by the River – Lovely Traditional Quilts and Projects
QuiltStory – Quilts and Patterns
From My Front Porch to Yours – Beautiful Home Decor Projects

I’ve been thinking once again about designing with a specific theme in mind.  If you have entered into juried shows that have a theme, you know the dilemma.  How literal do I need to make this piece to fit the theme?  Or perhaps you’ve just skipped entering those shows.

Since my preferred style in which to make art is representational or pictorial, I don’t usually have a great difficulty with making something to fit a theme.  My struggle is more about whether I really want to make a piece or not for that show.
As an example, I’d like to share about the 50th Anniversary Celebration of the Seattle Center.  In 1962, Seattle was the home of the World’s Fair… the grounds on which the fair was held is the Seattle Center.  Most notably, Seattle’s best-known landmark, the Space Needle was built for this 6 month festival and exhibition.

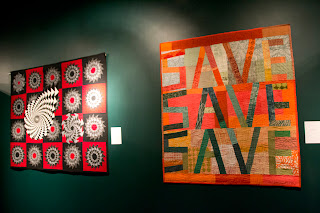
Helen Remick’s “Spinning Out, Spinning In 1” (left)
and Margaret Liston’s “Save” (right)

Seattle Center put out a call to artists for large proposals to show during the 6 months of the Next 50 Celebration.  The theme of the overall exhibit and performances was “Illuminating Today’s Challenges, Imagining Tomorrow’s Possibilities.”  The call was set up as a two-tier process.  You sent in an extensive original proposal through Café (Call for Entry), including a series of images representative of your art.  


As I am the Exhibitions Co-Chair of the Contemporary QuiltArt Association, I prepared this proposal for our group.  The second tier was like a call-back for an audition.  Except now, you had to do an elaborate proposal, including budget, recommendations on where within the Seattle Center grounds that your exhibit would take place, showing how your art would benefit and reflect the theme of the Next Fifty, and finally a video to support your claims of your work.    

Melisse Laing’s “Sorok dva – Russian Collaboration II”


In the end, we did get chosen for an exhibition, but we did not receive any of the grant money… not a big problem as our group doesn’t typically get paid to exhibit.  But when it came down to the “theme”, they decided they wanted to be even more specific.  The dates chosen for our group’s exhibition were during September and October (2012).  Each month of the celebration had a focus… September’s theme was “Commerce and Innovation” and October’s was “Civic Action.”  So, the name given for our exhibit was “Possibilities: Fiber Artists Look at Innovation and Civic Action.”  Can you imagine trying to get a group of quilt artists to tackle that as a theme?  (Imagine a great big eye-rolling from me here.)

Artist and CQA President Marylee Drake with
her piece “Gearing Up for the Future”

But, somehow our artists always come through with a wonderful show as you can see from the photos above.  Tomorrow, I’ll talk about and share some photos of the process I went through to make my piece “Graphene – The Miracle Material.”

You might also be interested in:
Designing for a Theme
A Day of Art
Making Fabric


I’ve been continuing to explore hand-stitch this last week and completed another sampler.  I’m not really sure where I’m going to be using this in my work this year, I’m just certain that I am.  I’ve seen so many spectacular pieces that were enhanced by using hand-stitch.   I’ve also noticed that show judges seem to appreciate the extra effort that an artist has put in, when there are hand-stitch elements.  Here are the stitches (on acrylic felt- not hooped):

Top row:

  1. Double Knot Stitch (aka Old English knot, Palestrina or Smyrna Stitch)
  2. Cable Chain Stitch.  This is like chain stitch, but with a link in between the chains
  3. Fern Stitch (aka Fern Leaf Stitch)
  4. Paris Stitch (aka Open Square Stitch)
  5. Fence Stitch (aka Bosnian Stitch)
  6. Tnorn Stitch
  7. Cross Stitch (aka Berlin or Sampler Stitch)
  8. Braid Stitch
  9. Singalese Chain
  10. Wheatear Stitch
  11. Fishbone Stitch (on leaves)

Bottom row:
  1. Whipped Backstitch
  2. Threaded Backstitch
  3. Double Threaded Backstitch
  4. Chain Stitch with Backstitch running through center
  5. Double Knot Stitch
  6. Petal Stitch
  7. Scroll Stitch
  8. Ladder Stitch
  9. Long Armed Cross Stitch
  10. Vandyck Stitch (aka Flat Variable Stitch)
  11. Long & Short Stitch (top leaf in oranges)
  12. Stem Filling Stitch (bottom leaf in blues)

I’m partially doing this work as I’m taking another hand-stitch course at the Gail Harker Center for Creative Arts in March.  I’m looking forward to getting more ideas in how to incorporate the hand stitches into my work.

Speaking of Gail’s classes, this Thursday, Jan 10 from 5-8 pm, the opening of “Complex Threads: Students of Gail Harker Center for Creative Arts” will be happening at the Schack Art Center in Everett WA.  If in the area, be sure to check it out!

You might also be interested in:
How to make a knotted blanket stitch (video)
More embroidery samples
Stitchwork Samplers

Between link parties from WIP (work in progress) Wednesdays at Freshly Pieced and Freemotion Fridays on the Freemotion Quilting Project, we’ve got a great start in generating interest in the 5 x 7 challenge for 2013!

Hand-painted and block-printed fabrics and papers
by Christina

I’ve been struggling with how to juggle getting a project done while designing and/or conceptualizing one or more others. It’s not like I don’t do this all the time in my everyday life… What woman doesn’t? Even my studio has a minimum of 4-5 things going at a time-some on the design wall, others in various states of completion. But when you come down to a commitment to produce a finished product each week, my stomach gets a bit tight, I wonder if I’ll be able to persevere throughout the year, and I feel a bit frantic about wanting to work ahead and get a bunch done, so that if things come up, I won’t end up with nothing to show for the week.  But that seems a bit off-target.  After all, the idea is to learn to consistently produce art, right?

Christina’s gradation run of sunshine yellow Procion MX dye

So, I’m taking a deep breath and thinking about how I’m going to do my next piece.  I also think that I’ll allow myself to work on design ideas in my sketchbook, which I can then decide whether I want to produce in a more finished form at a later date.  But I won’t actually have more than the current week and the coming week’s projects in any phase of production.

What I’m wondering is what would be the best way to balance getting my “other” projects complete.  After all, I do have other goals for 2013 which I need to make progress on.  I didn’t even put in additional time for dyeing and surface design in my goals, nor did I mention any of the pieces I have in various stages of completion, other than a vague mention of “ramping up my pictorial quilts” and having a couple pieces completed to enter in various shows.

As an example, in a little less than two weeks, my small art-quilt group (the Fiber Funsters) has our next meeting where we reveal our second challenge quilt.  (Details about this challenge are posted on my blog post “The Fiber Funsters 10×16 Group Challenge.”)  The current challenge is based on the word “Celebrate.”  It seemed appropriate for the holiday season and I had hoped to incorporate something which would work both for this theme and “Salsa!” the theme of the CQA Mighty Tieton show coming in early summer.  However, it just didn’t really work for me.  I designed a piece using photos from a cathedral door with a chili-pepper wreath on it, but when it was shrunk down to 10″ x 16″, it just didn’t work for me.  I may still create that piece in a larger format for the Salsa show, however.  So, now I’m working on something more abstract and playful with my hand-dyed and painted fabrics.  With time running short, I’m going to have to get a lot of time in behind my sewing machine this weekend!

Hand-painted and block-printed fabrics and papers
by Christina

Realistically, what I’m talking about is time management.  With my background in business, I understand and can get focused when I think about it in this way.  I can schedule my sewing sessions, make a timeline for when I have to get things complete, and have to-do lists for each step of each project.  The main thing is not to get mired down in the daily muck of being run by your plans and schedules.  That, after all, doesn’t really allow for free-flowing creativity.  However, it can be very useful for managing showing your artwork and possibly for getting more accomplished (I haven’t really tried it for managing my work in the studio.)

How do you manage your time, projects and priorities?  Do you work on one project or many?

You might also be interested in:
Making Fabric
Scope Creep
The Art of Organization

Gaches Mansion in 1891

Yesterday, I mentioned how I’d gone to the LaConner Quilt and Textile Museum.  This treasure in the Northwest is located in the fabulous Gaches mansion, which was built in 1891.  Unfortunately, this landmark suffered a horrendous fire in 1973 and it was questionable whether the mansion would be torn down or rebuilt.  Luckily for all of us, a group of LaConner residents were successful in getting the mansion recorded on the National Register of Historic Places and getting a grant for restoration.

Gaches Mansion Fire in 1973

The history of the mansion and the quilt museum which now occupies the historic building is quite fascinating… You can find it in the Museum’s History Section of their website.

Gaches Mansion today

The museum is now closed through mid-February for interior renovation.  The main cost is for a fire-suppression system… rather a necessity, don’t you think?  As of today, Jan 3, 2012, they still need to raise $950 more for the fire suppression.  If you want to donate to a worthy cause, please go to their website and click the “Make a Donation” button.

Dragon Moon Kimono by Cathy Erickson

The quality of the shows at the museum is incredible.  I was able to see two exhibitions.  The first was the “Best of the Festival” featuring all the amazing award-winning quilts from the yearly  LaConner Quilt Fest, an International juried show.  The entrants in this show include so many award-winning quilters that they have made “Masters” divisions for those who have won major awards in the past versus the Open divisions (so up and rising quilters will get their chance to win without having to compete against the Masters.)  The winner of the “Best Machine Quilting” for the whole show was Cathy Erickson (mentioned in yesterday’s post) with her “Dragonfly Moon Kimono” pictured here.

Detail of Cathy Erickson’s “Dragon Moon Kimono”

When you look at the detail of this quilt, you can get a sense of how utterly amazing Cathy’s quilting is.  She is a master at micro-quilting. The little overlapping circles (a common Japanese-styled quilting pattern) are only about 1/4″ across.  If I hear of Cathy doing any classes or demonstrations, I’ll be sure to let you know (as soon as I get signed up!)

I guess my main point tonight is just how important it is to expose yourself to art that you find inspirational.  Because of seeing Cathy’s quilt last week, I was inspired to try out micro-quilting.  Of course, not everyone has such a resource practically in their backyard, but that’s what is wonderful about the internet and blogging is that you can find inspiration every day.  I hope you’ll go ahead and start on your own 5×7 challenge piece today and be ready to reveal your first week’s art on Tuesday January 8.

By the way, thanks to Carol from “Landscape Lady” who recommended that we get a flickr group for sharing our photos.  I’m setting it up and will have it ready before Tuesday.  More on the shows I saw in La Conner coming soon!

You might also be interested in:
52 Week Challenge to Readers
Getting Started Might be the Hardest Part
Designing for a Theme