Ryan Holdridge, Eagle Scout with Mom, Christina

First and foremost… every mother deserves some bragging rights.  Tonight, my son Ryan completed the final step and earned his Eagle Scout rank!  We’ve been on that journey since 2001, including my being a den leader and assistant scoutmaster.  Woo Hoo!!!

This week has been a bit of a push… Not only did I work on my UFO Waterfall quilt, I wanted to have my 5 x 7 Artist Challenge Piece be able to coordinate into the salsa quilt theme. I’m pretty excited about the result so far. I’ve decided to not finish the edges of these salsa blocks, since I will be piecing them together into a full quilt.

The process for making this started with a photograph of a tomato. Actually, I picked out photos for each of the nine items (tomato, onion, cilantro, peppers, tomatillo, lime, chili pepper, corn, and onion.). I then removed backgrounds and resized the photos to fit the 5 x 7 format in Photoshop. I then printed the photos (2 to each page) on COTTON from VV Prints -(add link and type of cotton).

Start of thread painting the tomato

I keep my thread sorted by color, rather than type, with the exception of metallics. Since I decided to start with the tomato, I pulled out a wide range of reds and oranges, changing in value from tangerine and pinks, through the true hues, up to dark maroons and deep rusts. I placed them in a line of values- light to dark, so it would be easy to pick out which colors would be next in shading.

I then hooped my tomato.  When you are doing machine embroidery, it’s important to use stabilizer (I used two layers-one of  Pellon Stitch N Tear  the second OESD Heavy-weight cut-away Embroidery stabilizer) to help ensure you embroidery won’t get misshapen. You also hoop opposite from the way you do with hand embroidery, so the fabric is laying along the bottom of the hoop, rather than across the top edge. This way the fabric is flush up against the sewing table.

“Tomato” stitched on marked background

I then started freemotion thread painting.  I layered colors, particularly where I wanted to blend shading. I generally try to start with areas that would be further away from the viewer and end with the places that would be closest, the help create a more 3-D effect.

After completing the tomato, I turned to the background on which it would be placed. I knew I waned to have the names of each fruit or vegetable printed out on the background, so I decided to try my friend’s process for text (see note on how to do this with Marylee Drake’s ‘Celebration’ quilt.) I picked  a fun Font to go along with the Salsa theme and stitched it onto the background.

Adding decorative stitching

Added freemotion quilting
Coloring edge of embroidery so it can be turned under

Next, I marked my background with a Dritz Fine Line Water Erasable Marking Pen – Blue to help keep my lines well-spaced.  I then added both machine decorative stitching and Freemotion quilting to the background that would accent and complement both the tomato and the Salsa theme.  For the Freemotion quilting, I turned to Leah Day’s Freemotion Quilting Project and found a few designs that would give me the effect I wanted… To look like Mayan patterns. I decided on Square Shell (without filling in the small square), and a cross between Echo Maze and Circuit Board.

Turning edge under using Roxanne Glue Baste-It

Finally, i colored the edges of the white fabric around the embroidery using a Stained by Sharpie Brush Tip Fabric Markers before I hand appliqued the tomato onto the background.  I added two layers of batting between the embroidered tomato and the backing, with the first just slightly smaller than the size of the tomato, and the second a smaller oval, so it would help add a three-dimensional more rounded shape. I used Roxanne Glue Baste-It to help hold the edges under as I appliquéd.

My completed 5 x 7 piece “Tomato”

The only step, other than finishing the edges, which I still need to decide whether to do or not is whether I’ll paint in the lettering.  I’ve decided to hold off for now, as I want to test painting letters this size, before I try it on my finished piece.

This week my blog was featured on FreeMotion by the River!  Thanks, Connie!


You might also be interested in:
Current Works in 
Progress
Fitting my Challenge 
with Showing
2013 – The 5 x 7 
Artist Challenge

Check out these great blogs I’ve linked up with!

Freemotion by the River

Nina Marie Sayre Quilt Art

Confessions of a Fabric Addict

QuiltStory

Richard and Tanya Quilts

Freshly Pieced- Work In Progress Wednesdays

Made by Me!

Quiltsy Check out the wonderful seed stitch info on their Jan 17, 2013 post.

Last week I promised to get back to my UFO “Waterfall Quilt.”  Well, I’ve made some progress with it:

Waterfall Quilt last week
Waterfall Quilt this week
One of the waterfall squares with
curved piecing

As you can see, I’ve added a couple rows (and I obviously need to get a larger design wall that my pieces can stick to!)  More importantly, I think, is that I removed pieces that I felt didn’t really work, either due to the patterning of the material, or more likely, the color flow wasn’t right.  Actually, now that I look at the photograph, I see a few other pieces that I’ll probably switch out, since they don’t have quite the right value. I call this my waterfall quilt as I wanted the curved pieces to make it feel like water trickling down, as well as the blues and greens to represent the water and surrounding forest.

I thought you might like to find out how I do the curved inserts which I’m working on adding to all the blocks. Believe it or not, it’s a fairly simple process.  Certainly simpler than doing the video… so please excuse me if my videography needs a little perfecting!

For other interesting blogs and tutorials:

Check out how other quilters are finishing up their UFO’s on Leah Day’s Freemotion Quilting Project

Carol’s portrait of Max, a yellow lab shows a great progression for doing a pictorial quilt.

You might also be interested in:

Fresh Poppy Design
Week 2 of the 5 x 7 
Artist Challenge
Fireworks Freemotion 
Quilting Design
How to Make a 
Knotted Blanket Stitch
Quilt Story’s Block 
Tutorial Links

My first week’s piece for
the 5 x 7 Challenge

For those of you just tuning in, I not only have the 5 x 7 Challenge going on this year, where I make one 5″ x 7″ artwork each week, but I also actively show my fiber art work.  As the Exhibitions Co-Chair (along with Carolyn Hitter) of the Contemporary QuiltArt Association, I do all the planning and production of setting up exhibitions for our 100+ member group.  Currently, we have 19 members with work that will be shown in the Patchwork and Design Festival in both Rio de Janiero and San Paulo, Brazil.  The quilts have arrived there safely and in plenty of time, so my work there is pretty well done until it’s time for the quilts to come home.

Our next exhibition which I’m working on will be at Mighty Tieton, an artistic community in Eastern Washington.  Since the surrounding area is particularly known for their produce and fruit production (in fact the gallery is in an old fruit processing plant!) and the community has a large Hispanic population, they asked for our theme to reflect this if possible.  We’ve named the exhibit “Salsa!” and hope to get member entries that will reflect this theme in numerous ways.

I’m faced with the difficulty of  putting in lots of hours into setting up, doing logistics, getting entries, jurying the quilts and art cloth, etc. and wanting badly to also participate in showing my artwork.  But creating a piece takes time… a commodity that I’m a bit shy on these days!  So, here’s my plan… I thought what I could do is a coordinating 5 x 7 piece each week for 9 weeks, then put these together into a quilt.  I’m planning to do a thread-painting of the following fruits and vegetables:

  • tomato
  • onion
  • cilantro
  • lime
  • corn
  • tomatillos
  • peppers
  • avocado
  • chili peppers
Detail of quilt made from Guatemalan
fabric by artist Priscilla Bianchi
Then, each thread painting will be appliqued (probably with a bit of trapunto) to a quilted coordinating background.  I’m not sure about how they will all fit together yet, possibly with some of my hand-woven Guatemalan fabric, or even with machine-made lace.
What do you think?  I’d really love some comments on this idea… combining my 5 x 7 challenge with the Salsa exhibit seems to kill two birds with one stone, yet maintain the spirit of my challenge to create each week.
You might also be interested in:

“Opening” by Christina Fairley Erickson

A small favor to ask… I’ve entered my quilt “Opening” in a online gallery of challenge quilts which viewers can vote on their 4 favorites.  Please check it out and vote for your favorites!  http://quiltinggallery.com/2013/01/18/vote-challenge-quilts/

Last Wednesday, I showed the quilts that our small art quilt had made for our first challenge around the word “Opening.”  Today, I have the next set, which were made with the prompt “Celebrate.”  Due to the holidays, not everyone had either finished a piece, but we have quite a bit of diversity in what we do have!

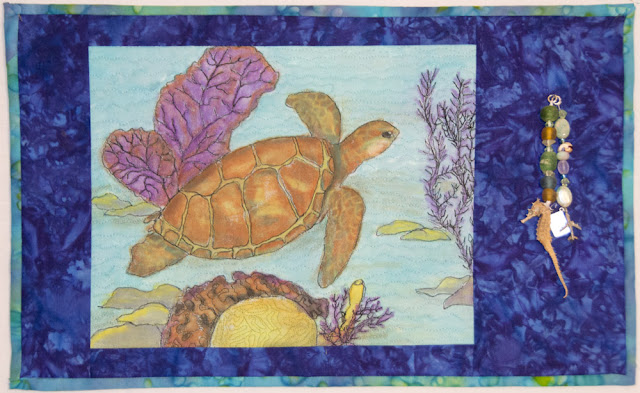
The first piece, made by Sally, is entitled “Celebrate! Belize Anniversary.”  Sally and her husband went to Belize for their 40th anniversary and really enjoyed the snorkeling.  Sally had recently taken Lola Jenkins‘ Thread Art Class through Craftsy, and used her know knowledge to make the incredible picture in this quilt. She layered the color using Crayon d’Arche Swiss water soluble pastels and encapsulated it with Textile medium.  The beads hanging on the left include gifts of a dried seahorse which Sally had received from her family and a mini plane and passport.

“Celebrate! Belize Anniversary” by Sally Simmons
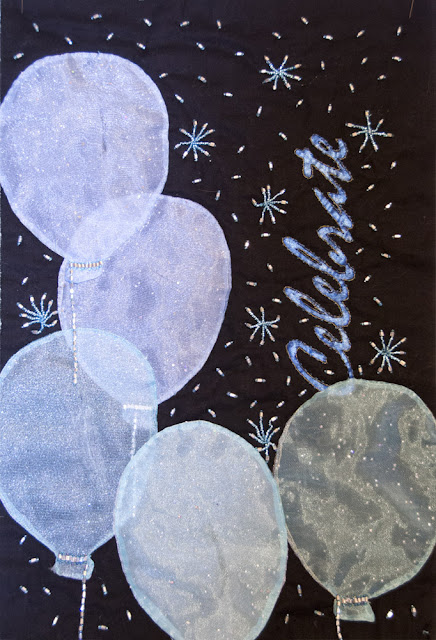
“Celebrate!” by Marylee Drake

 Marylee and I were on the same wavelength, inspired by the incredible fireworks show at the Space Needle for New Years Eve.  See my post “Fireworks Freemotion Quilting Design” for a great photo from that show.  Marylee’s piece is hand-stitched and beaded for the fireworks.  Her balloons are double layers or organza–she didn’t quilt them down, so they are puffy, semi-transparent and add a great texture.  She had a fantastic tip for getting lettering on a quilt- print out the word(s) you want in the font and size you want from your computer.  Then put that paper on the right side of your quilt and stitch over it.  Tear away the paper (you might want to use paper-piecing paper which runs through your printer).  Then you can either add additional stitching or paint in the lettering, as Marylee did here using Lumiere fabric paints.  Marylee still has some work to complete, including possibly adding in a small Space Needle to finish the piece off.

I used my hand-dyed and painted fabrics to make an abstract piece that reminded me of New Years.  I quilted the piece with the fireworks design I created, then quilted over the right-side fireworks with silver thread, to echo the silver in the painted section in the center.  I also added a decorative machine stitch in the center portion and some fuzzy, metallic yarns.

“Fireworks” by Christina Fairley Erickson
Caroline has lived a fascinating life with lots of travel to remote places and living abroad while in the Peace Corp.  When she lived in Africa, it would be completely dry for 6 months.  When the rain finally came, it was something worth celebrating!  Children would go out and dance naked in the rain, mothers would hold their squealing little babies out from under the eaves in the downpour, everyone would sing and be joyous.
“The Rain He Done Come” by Carolyn Hitter

You might also be interested in:

Fireworks FreeMotion 
Quilting Design
“Opening” 
The Fiber Funsters 
Group Reveal 1
The Fiber Funster’s 
10 x 16 Group Challenge

Fantastic Blogs to Check Out:
For great ideas on how to freemotion quilt your projects, go to the Freemotion Quilting Project.  Leah Day’s tutorials are fantastic!

Get inspired with different quilter’s completions at Confessions of a Fabric Addict!

Nina Marie Sayre’s great art quilting blog shares a great way to transfer a drawing onto fabric for redwork or other stitching

See some great projects and quilts recently finished on Richard and Tanya Quilts

The Fiber Funsters, my small art quilt group, met this morning at my home for our monthly meeting. Our group decided last summer to start doing a challenge piece based on a particular word every-other month. Our first word was “Opening” and we shared these pieces with each other in November.     Today I was able to photograph most of our pieces to share here!  
“Convento Santa Catalina” by Carolyn
Hitter

The first piece to the left, “Convento Santa Catalina” was made from a photograph that Carolyn took at a convent in Arcquipa, Peru.  Carolyn’s technique includes the use of tulle to create the shading and shadows.  She built up separate parts of the landscape and then put the different elements together, doing a majority of the stitchwork before backing the piece and keeping the quilting minimal.

Opening by Rebecca Simmons

Next, Rebecca also chose an opening flower (as did I.)  Rebecca made her piece using Tsukineko inks, basically painting both the flower and background.  She uses heavy stitch to accent the petals edges and veins.  The center of her flower has Angelina fiber and beading.

“Opening” by Debbie Hiatt

Debbie’s piece is abstract, using up “leftovers” – scraps of silks most of us would love to have!  She highlights the “opening” in her piece with hand embroidery stitches, while the curved machine quilting echos the shape of the opening.

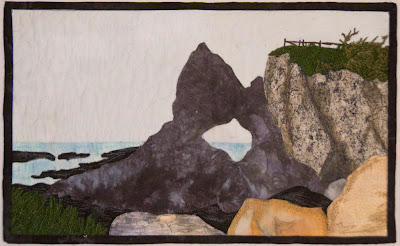
“Australia Rock” by Sally Simmons

“Australia Rock” in Narooma, Australia has a natural opening that Sally remembers vividly from her trip there. She used one of her photos to complete this piece, adding shading with tulle and very realistic looking greenery with threadwork.

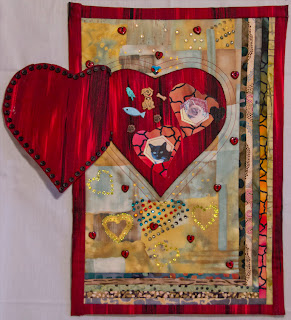
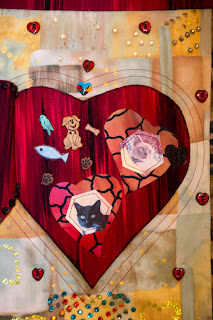
Charo Lopez’s “Open to Love”

What would this theme be without a piece that really opens?  Charo’s heart stays closed with a bit of velcro, but you can also open it to see what is inside… the great loves of her life, her pets.  She says that Devon, the black cat, is her only pet at this point, but the others are waiting for her in heaven.  Charo used a template of hearts with glitter, paint, and rhinestones at different places over the piece, as well as lots of buttons (surrounding the main red heart both outside and inside, giving a real depth to the piece, and little heart buttons interspersed on the front.)  She printed photos on fabric of two of her animal loves, as well as having different charms to represent some of her pets.

“Open to Love” by Charo Lopez with heart opened
Close up of the inside of Charo’s heart

Marylee designed this cute piece with “openings”.  The little round balls seem to be rolling down the planks and through the openings like a pinball or pachinko machine, only to end up being gobbled up by a “Pack-man” shaped object.  Guess this dates me that I know pinball, pachinko and packman, huh?

“Opening” by Christina Fairley Erickson

I’ve shown the piece I made called “Opening” previously on this blog.  It is all machine embroidered.

While some of our newest pieces are still works in progress, I’ll share them soon!

Thanks for all the inspirational projects at Seven-Alive! and Sincerely, Paula.

You might also be interested in:

The Fiber Funster’s 
10 x 16 Group Challenge
Designing for a Theme Designing for a Theme 
– Innovation Part 1

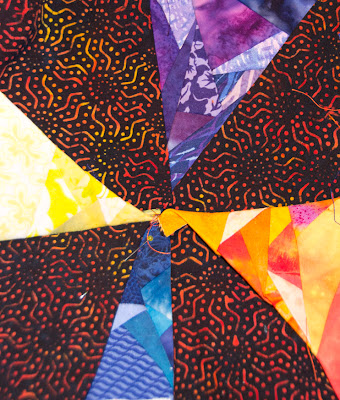
This week I’ve completed this windmill design for the 5 x 7 Challenge. As I mentioned previously, I haven’t done a lot of paper-piecing before, but it seemed like the perfect technique for the background color splashes which I wanted.

Week 2 completed piece for the 5 x 7 Challenge
Designed and made by Christina Fairley Erickson
Original hand-drawn design
Back side

I ended up change quite a few things from my original hand-drawn design. First, I had small triangles around the center circle of the windmill, which I decided would simply be too small to be done effectively for the size of the finished piece. As I was going through my fabrics for the yellow color section, I found one with the circular motif which I decided would work well as the center, and chose to hand-appliqué it on. The other major change is that I didn’t add any struts to the windmill blades. I was going to machine appliqué some red fabric, but it looked too heavy. I then thought I’d machine quilt lines in, but once I finished quilting the colored background areas, the result was that the “windmill blades” and center stand or puff out since they haven’t been stitched. I like the look this way and think the result of stitching in strut lines may ruin this effect.  The other obvious change is that I decided to change the placement of the colors.

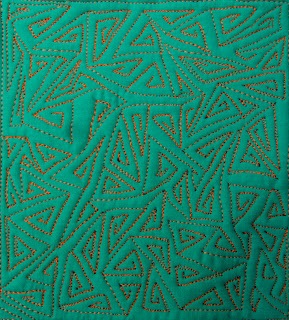
Sample/tester I made of Leah Day’s freemotion
quilting design “Sharp Angled Maze

I tested out a freemotion quilting design which I thought would work well for my background colors which I found from Leah Day’s Freemotion Quilting Project which she calls “Sharp Angled Maze.”  Overall, I think the design worked well within my piece.  The one problem that you can catch glimpses of is that with using a different color of thread on the back side of the piece, you can occasionally see bits of the bobbin thread on the front.  In the practice piece, you can see this in the lower half (particularly lower right), but I was able to adjust my machine tension to get rid of the problem.  I’m not sure whether it was the additional thicknesses of the seam allowances, but even with my top tension adjusted all the way down as far as it goes, I still had a little bit of bobbin thread showing.  If I were doing this for a large piece for competition, I’d probably work with it more.  Perhaps a smaller needle size?  Different thread?  Tighten the bobbin tension?

The other criticism I would have of this piece is that when you are further away from it, the blue and purple sections are a bit too close in value to the black/red/orange/yellow windmill blades.  If I were to do it on a larger scale, I would want to add more light values into those sections.

I welcome your comments and critiques on my pieces!

Thanks to other participants this week in our challenge!  Here are what others are working on:

“Wet” –  Hand-painted, thread-sketched and discharged
with bleach pen by Carol

Carol “LandscapeLady” has created this wonderful piece entitled “Wet”.
Check out her blog to see her photos of working on this piece throughout the process from photo to completed 5 x 7 art piece.

I really love the movement in the piece… you can feel, as well as see, the drops of water being joyfully shaken off this dog!

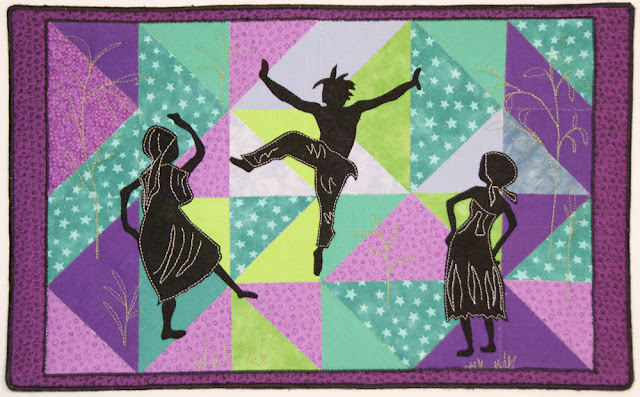
“Indonesian Dancer” – Work in Progress by Lise

Lise has this work in progress called “Indonesian Dancer.”  She is planning to add more to it, so we’ll look forward to seeing more- next week?   The repetition in this piece: wavy lines, musical notes, headdress elements, and sets of eyes all building the theme.  The wavy lines and lines surrounding the face particularly add to the primitive, ethnic feeling.  I can’t wait to see it finished!

Other blogs to check out:
Work in Progress Wednesdays at Freshly Pieced – delightful modern quilts

Wow Us Wednesdays at Savvy Southern Style… there are some really amazing projects here!

A Lovely Year of Finishes from Sew Bittersweet Designs has a great monthly goal-setting and project-finishing challenge

You might also be interested in:

Week 1 of the 5 x 7 
Artist Challenge
Getting Started May be 
the Hardest Part
52 Week 5 x 7 Challenge 
to Readers

My “Celebrate” piece (unfinished)

I’m working to finish up my “Celebrate” 10 x 16 Challenge quilt for my small Art Quilt group, the Fiber Funsters.  I struggled with this theme for some reason… with the holidays, it seemed like it would be a no-brainer.  But I finally decided to play with some of my hand-dyed and painted fabrics I had made and came up with an abstract design that I’m satisfied with.  Maybe not thrilled, but satisfied.

The feeling that I got from the fabrics in relation to the theme of “Celebrate” was the lights, colors, and excitement of New Years eve.  So, I decided to play around tonight with making a new freemotion quilting pattern of fireworks to go along with it.  This is particularly appropriate here in Seattle, where New Years is celebrated with an incredible show of fireworks coming out of the Space Needle

“Fireworks” Freemotion Quilting design by Christina Fairley Erickson

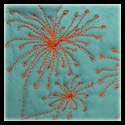
The Fireworks design is fairly simple.  I started from the bottom, making a long curved line up to the top “firework” and mad a little circle there.  I then built outward- a line out with a little circle on the end, then traveling back down the line to the center circle, going around the center circle until there were multiple explosions outwards.  When I felt there were enough, I traveled back down the original line and built out one or more additional fireworks.

I don’t think you need to be too careful with this design, as fireworks leave additional streaks of light, so travel stitches don’t have to be too exact.

This design would also be good as dandelion seeds or a wispy, whimsical flower.

Thanks again for all the inspiration I’ve received in trying out freemotion quilting from Leah Day and her Freemotion Quilting Project.  By watching her videos and reading her blog regularly, I was able to come up with this design on my own!

Wish me luck… I have my 5 x 7 Challenge piece for the week completely pieced, but need to finish the quilting tonight before I reveal it tomorrow, and this one needs to be done by Wednesday morning, when the Fiber Funsters come to meet at my house!

For some fun quilting blogs go see:
Quilt Story
Freemotion by the River

You might also be interested in:

The Fiber Funsters 
10 x 16 Challenge
Artistic Goals 2013 Juggling Many Projects

Today was a fairly low-key day.  I’m trying to go along with Leah Day’s Freemotion Quilting Project focus on UFO’s each Sunday.  Today her FMQP blog post discusses getting negative reviews online.  I guess I’m kind of shocked.  I feel like Leah has given such a wealth of knowledge out for free and that she does a beautiful job.  Please stop by and give her some positive comments (if you haven’t seen her blog before, you really need to check it out!)

Back to UFO Sunday, here is the UFO that has been on my wall without progress for 6 months.  It’s a color progression with a contrasting curved piece through each block.  Although I don’t normally do block-based quilts, I wanted to practice some simple curved piecing and started on these 8″ squares.  I kind-of ran out of space on my design wall however and obviously haven’t finished up the curves in all the blocks I have up yet.

My thought has been to sew 1-2 vertical rows together at a time and then quilt them in those rows, putting the whole quilt together after doing the quilting.  I’m still struggling a little with how you put the quilt together after quilting, but want to try it out, since I hopefully have quilted my last king-sized quilt on my home machine after it was all pieced!  I’m thinking that using Leah Day’s “Mesh Curtain” pattern for the long vertical rows.

So, my commitment is to make some progress this week with this quilt, before the next UFO Sunday!

The other piece I’ve worked on today is my second week’s 5 x 7 Challenge piece.  I completed the paper piecing and now need to aapplique the center circle and rungs of the windmill blades, before I can start quilting it.

Beyond my indoor projects, my husband Randy and I, along with our two boys Ryan and Coleman and our dog Dexter, went for a winter’s walk at Marymoor Park in Redmond.  It was about 30 degrees and the frost twinkled on the trees and shrubs.

Reflections on the water
Partially frozen stream through the marshlands
Ice and frost in marsh grasses
Beautiful winter light and reflections
Christina with sons Ryan (left) and Coleman
(right) and Dexter (with the long ears)

Husband Randy with Dexter

Golden Hour at Penn Cove 
& Monet’s Haystacks
What I Want My Children 
To Know
Sunshine and Sand 
Design Inspiration

Today turned out fantastic at our CQA meeting!  We had the following stations for making surface-designed fabrics to contribute to Stashfest:

Christina Fairley Erickson (me!): Shiva Oil Paintstick Rubbings, Stencils, Fabric Markers and Tsuneko Inks
Cameron Mason: Mono-printing with thickened dye
Colleen Wise: Thermofax silkscreening and foiling
Peg Swartzman: Oil Paintsticks with resists and stencil brushes
Kathy Cooper: Printing with Print blocks

Peg Swartzman teaching how to use Oil Paintsticks with
Freezer paper resists and stenciling brushes for an
elegant gradient effect

Cameron Mason (far right) teaching mono-printing with
thickened dyes to Roslyn Duffy (left) and Roberta Andreson (center right)
Roslyn Duffy’s mono-print with thickened dye
Flora Dalglish making Shiva oil paintstick
rubbings at Christina’s station

Debbie Babin designing with fabric markers after adding oilstick rubbings
at Christina’s station
Barbara O’Steen (left), Barbara Kanaya (center) and Debbie Babin (right)
working at Christina’s stenciling, fabric pens, and oil stick rubbing station
CQA President Marylee Drake (foreground) doing
Thermofax screen printing with Colleen Wise (background)
Some of our finished packets of fabrics to sell at Stashfest
We labeled each packet with the artist’s name who made the fabric(s), size(s),
and the processes used on each piece.


Stashfest Creator and CQA Member, Patricia Belyea
measured the fabrics and helped bundle them for sale

Want the chance to buy some of these wonderful fabrics?  Come to Stashfest April 6 and 7 up in LaConner!

You might also be interested in:

Making Fabric Viewing for Inspiration Making Fabric

Sketched in pencil first from a photo, then traced to
fabric and thread sketched by Carol

First, I want to share Carol’s first 5 x 7 Challenge piece. Check out Carol’s blog: LandscapeLady – Art Quilts from Vermont.  I think she’s done a wonderful piece and is working on a fantastic quilt of a dog in the style of David Taylor.

I recently saw a couple of David’s quilts at the Material Men show at the LaConner Quilt and Textile Museum.  They were truly breathtaking, at least for those of us who love pictorial / representational quilts.  The show featured 16 male quilt artists… not just because they are men, but because they are also exceptional artists.  I brought my husband and sons along to this exhibit and my husband was particularly intrigued with how he felt the men expressed themselves differently in the quilt medium than women do.  Some was thematic, some was stylistic, and some just gave a different impression or vibe than you might see at your local quilt show.

This evening I’m packing up my truck to bring a slew of surface design materials to the CQA meeting tomorrow morning.  We’re having a surface design party to make fabric to sell at Stashfest, a fundraiser for the LaConner Quilt and Textile Museum.  I made some last month with a few friends (see Making Fabric) and suggested to the group that we do it as a big group activity this month.  We’re going to have stations with thermofax silk-screening  Shiva oil paintsticks and rubbing plates, stencils with fabric markers for drawing and Tsukineko inks, foiling, and mono-printing with thickened dye.  We should have a wonderful assortment of fabrics to sell in April.

As part of my contribution to Stashfest, a tour of my studio will be up for sale!  Call “Stashfest Insider Visits” people can purchase tours of many different artist’s studios.  I’ve been working on studio organization, so now I’ll have to get really serious!

Last bit for this evening… I started a Fiber Artist Journey Facebook group, where we can also share photos and discussions.  Please click the link and “Like” the group to stay in touch!

You might also be interested in:

Making Fabric Viewing for Inspiration CQA Surface Design Party