My “Celebrate” piece (unfinished)

I’m working to finish up my “Celebrate” 10 x 16 Challenge quilt for my small Art Quilt group, the Fiber Funsters.  I struggled with this theme for some reason… with the holidays, it seemed like it would be a no-brainer.  But I finally decided to play with some of my hand-dyed and painted fabrics I had made and came up with an abstract design that I’m satisfied with.  Maybe not thrilled, but satisfied.

The feeling that I got from the fabrics in relation to the theme of “Celebrate” was the lights, colors, and excitement of New Years eve.  So, I decided to play around tonight with making a new freemotion quilting pattern of fireworks to go along with it.  This is particularly appropriate here in Seattle, where New Years is celebrated with an incredible show of fireworks coming out of the Space Needle

“Fireworks” Freemotion Quilting design by Christina Fairley Erickson

The Fireworks design is fairly simple.  I started from the bottom, making a long curved line up to the top “firework” and mad a little circle there.  I then built outward- a line out with a little circle on the end, then traveling back down the line to the center circle, going around the center circle until there were multiple explosions outwards.  When I felt there were enough, I traveled back down the original line and built out one or more additional fireworks.

I don’t think you need to be too careful with this design, as fireworks leave additional streaks of light, so travel stitches don’t have to be too exact.

This design would also be good as dandelion seeds or a wispy, whimsical flower.

Thanks again for all the inspiration I’ve received in trying out freemotion quilting from Leah Day and her Freemotion Quilting Project.  By watching her videos and reading her blog regularly, I was able to come up with this design on my own!

Wish me luck… I have my 5 x 7 Challenge piece for the week completely pieced, but need to finish the quilting tonight before I reveal it tomorrow, and this one needs to be done by Wednesday morning, when the Fiber Funsters come to meet at my house!

For some fun quilting blogs go see:
Quilt Story
Freemotion by the River

You might also be interested in:

The Fiber Funsters 
10 x 16 Challenge
Artistic Goals 2013 Juggling Many Projects

You might want to start with a little history and look at Designing for a Theme: Innovation Part 1.

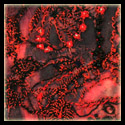
Artist rendition of Graphene molecules

With the topic “Fiber Artists Look at Innovation and Civic Action”, I personally decided to narrow down possibilities by choosing to represent innovation.  Since I’ve always enjoyed science, I started with looking at scientific journals and find out what some of the recent innovations have been that are expected to revolutionize areas of our lives.  This is where I found out about Graphene.

Graphene, a form of carbon only one atom thick and in a hexagonal cellular structure, is both the thinnest and strongest substance now known to man.  Scientists believe it will revolutionize technology from computer and mobile displays, medical devices, aerospace, desalination plants, electronics and countless ways which we cannot yet predict.  Since I’m a technology fan and my husband’s business is in aerospace, this seemed like a good place to start.  If you want to see a really cool futuristic video, check out this short YouTube “Future Applications of Graphene.”

So now I had a topic to try to represent to go along with the theme… but what could I do with it?  I decided I wanted to represent both the uniqueness of the material (thin, lightweight, hexagonal cellular structure) as well as some of the possible applications of the technology.

Another little aspect that I had to keep in mind was the unusual gallery space that this piece would (hopefully) be hanging in.  The walls were mostly all a deep dark forest green (with a hint of teal) and a couple that were a bright spring green.  Not exactly easy to hang anything on, but ok if you’re specifically designing for the backdrop color.

My idea was to have a thin sheer layer cut in a hexagonal pattern that would fiat above the quilt, which would be surfaced designed to tell more of the story. I started the quilted layer with white Pima cotton. I bought some plasticized wire garden fencing that had hexagons as its design, and started with placing it on top of the white fabric and spritzed jacquard Textile Paint through it. This created a resist, with a painted background (in blues and greens) with a shadowy faint white hexagonal grid.

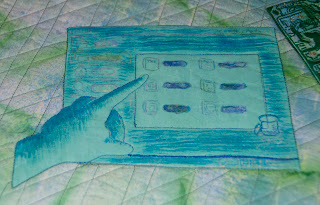
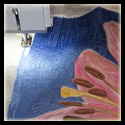
Representation of a computer touch-screen made with a
thermofax silkscreen and hand-painted shading

I then created several black and white images from photos (using Photoshop) of things that will have future applications using graphene. These included a commercial airplane, computer circuit boards, a smartphone, and a computer touchscreen. I then turned these images into silkscreens using a thermofax machine. I layered these different images around on the background, using Versatex print ink.  I added some hand painting and when the paints were all dry, I finished the back/quilt with a diamond grid pattern for the quilting, as well as freemotion elements around each of the special elements.

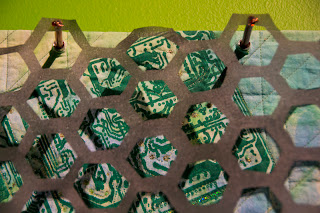
Silkscreened computer circuit board with gold metallic
thread freemotion quilted to look like metal elements.

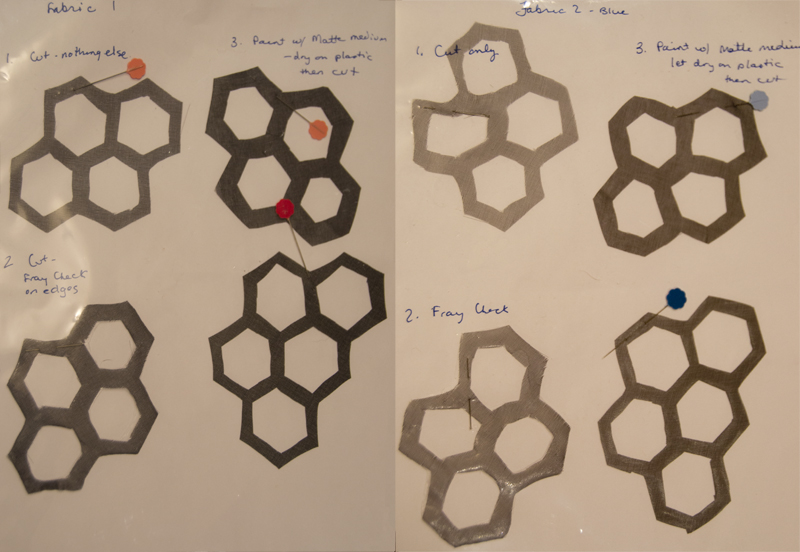
Now it was time to figure out how to represent the one-atom thick sheets of this hexagonal carbon molecule. I knew I wanted to have it be somewhat sheer (and black, since it is carbon, after all.) I thought that using a black organza might get the effect I wanted, so I bought some of each silk, rayon, nylon and polyester organza to test. I had a couple of different ideas on how to cut out a grid that wouldn’t ravel and could hold up, yet not be too terribly difficult or end up too uneven.

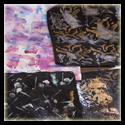
Some of my samples testing different organzas and ways to
cut and make sure they wouldn’t fray

The most consistent method and material turned out to be painting the nylon organza with matte medium, drying it, and cutting out the interior hexagons with small, sharp scissors. I’d been a bit surprised by this, thinking that a hot knife might cut and melt a synthetics edges at the same time, but it proved to be more difficult and harder to be exact than using my small Kai scissors.  Also, I tried treating with different products with varying degrees of success.  Some items made the organza too stiff (I wanted it still to be able to move in a breeze, to demonstrate the thinness of the graphene); others, like Fray Check, left a shiny plastic-like coating.

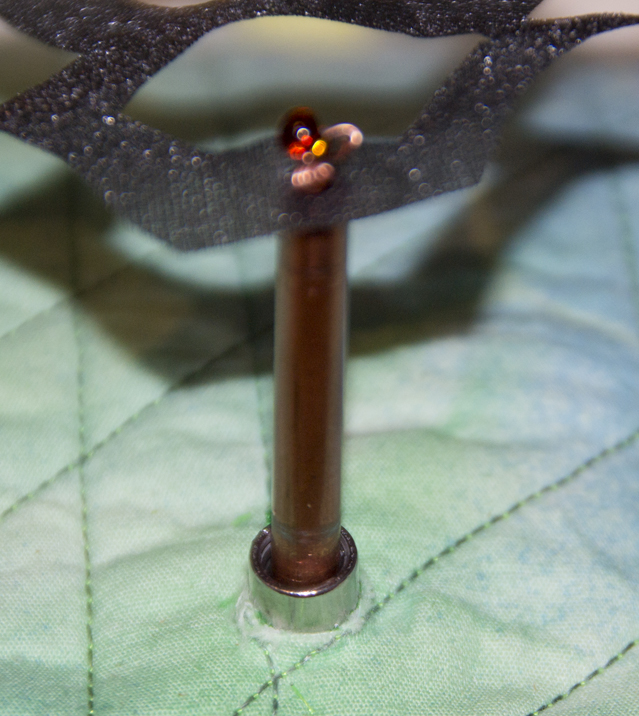
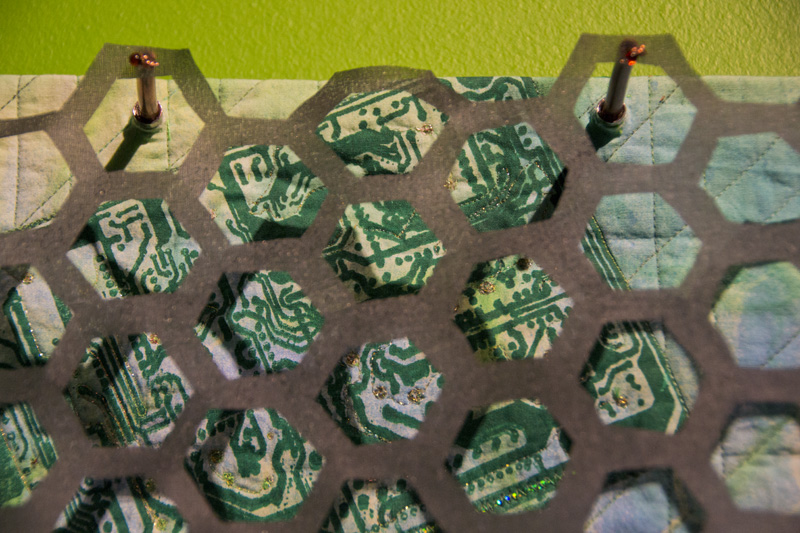
Close-up of grommet, copper pipe
& bead hanging mechanism
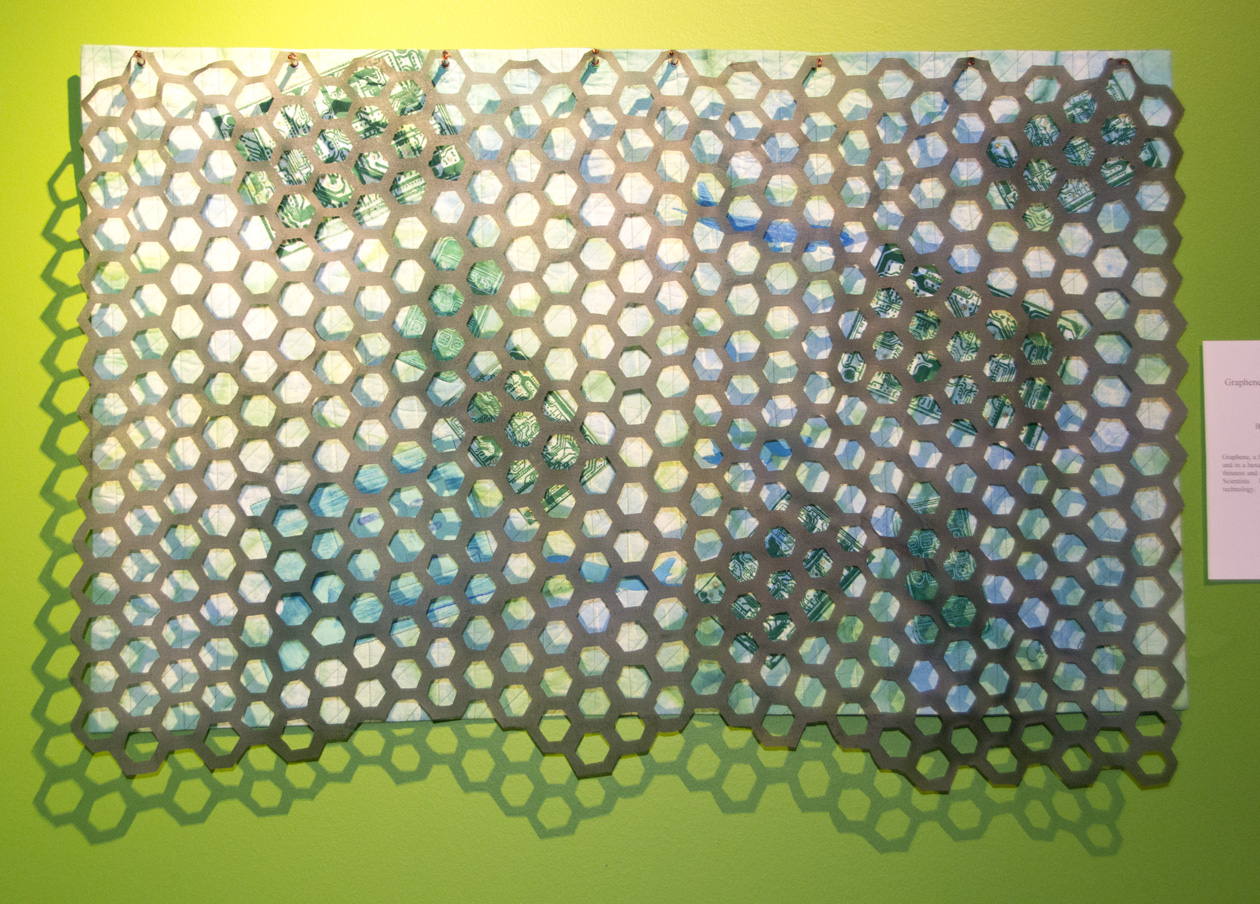
The organza hanging

You can imagine the time it took me to cut out each of the little hexagons on the finished piece!  The next step was to figure out how to affix the top layer so it would hang out separately from the quilted back piece.  This turned out to be quite tricky.  After many trials and errors, I was able to get a decent effect using some heavy-duty grommets, 1/8″ copper piping, copper wire, and beads.

Thankfully, my efforts were rewarded by the jury and my piece was accepted into the show!  Here is the final piece, hanging at the Seattle Center Next 50 Exhibition!  I particularly like how the hanging grid creates such interesting shadows with the gallery lighting.  The only disappointment to me was that the show chair who mapped out where each piece was to go, choose to put my piece on one of the couple spring green walls, after I’d designed it to go on the dark green ones!  Well, you can’t control everything!

“Graphene: The Miracle Material” by Christina Fairley Erickson
Whole-cloth 100% cotton background quilt hand-painted, silk-screened and machine quilted by artist.  Upper layer nylon organza treated with matte medium and cut into hexagonal grid attached with copper pipe, copper wire, beads and metal fittings by artist.

You might also be interested in:

Designing for a Theme… 
Innovation Part 1
Designing for a Theme Journeys Show at 
SeaTac Airport
Original sketched design

New week, new project. Well, actually one completely new, one just finished, and another in process. First, I started my next 5 x 7 Challenge piece, which I had sketched out last week.

Paper-piecing pattern

In thinking about how I could most effectively make this, I decided that paper-piecing would probably be the quickest with a nicely finished result. Since most of my art isn’t geometric, I haven’t had a lot of practice with paper-piecing.  

First section completed

This is where those of you who are familiar at this skill will probably laugh.  When you look at my pattern to the left, I have had to build each section with numbering.  However, I’m having to build parts of the sections on separate papers and then combine them, as my lines don’t all match up.  It’s seeming to work however.

“Opening” by Christina Fairley Erickson
100% Freehand Machine embroidered and Freemotion Quilted

I also just completed my first piece for the Fiber Funsters 10 x 16 challenge. Guess I’m all about the challenges this year! finishing off this dense freehand machine embroidery was more difficult than I expected. I decided to do a trap unto effect with a second layer of batting inside the lily, to have it stand out from the background. I then added the backing and freemotion quilted around the flower and in uneven horizontal lines over the blue background. Of course, I realized after doing a good portion that I could have just as well quilted from the back side since the flower was already outline, which would have made it possible to have even spacing of the lines. As it turned out, I couldn’t distinguish my quilting lines from all the thread of the background, which makes it a little less precise when you view from the back side.

“Opening” back – faced and freemotion quilted
See the white
on the edge?
The real difficulty came when I faced the piece and tried to turn the facing to the back. With such dense stitching, it was remarkably stiff and didn’t want to gracefully bend and hide the facing. Also, the process stressed it a bit and little bits of the white under-fabric were showing through.


The edge after painting
with fabric markers
See the difference/?
Well, I steamed and starched and pulled and cajoled, stay-stitched the seam allowance to the facing, and cut away as much of the seam allowance as possible.  I hand stitched the facing down, but still wasn’t fully satisfied with the result.  In the end, I dug out some fabric markers and ‘painted’ the edges and little white spots that shouldn’t be showing!  I think it did the trick!


My final piece to share is the second quilt for Fiber Funsters.  The word we’re using this time is “Celebrate!” as our theme.  I’m not sure what I think of this piece yet or if it has any promise.  I played around with some fabrics I’d hand-dyed and painted and this is how far I’ve gotten.  I don’t really know how I’m going to free-motion quilt it yet… But it’s supposed to be done in a week, so that gives me a little motivation!

“Celebration” – work in progress by Christina Fairley Erickson

You might also be interested in:

52 Weeks of Art The Fiber Funster’s 
10 x 16 Group Challenge
2013 Open 5 x 7 Challenge


Blogs You Should Check Out!
For Fantastic Tutorials on FreeMotion Quilting go to The FreeMotion Quilting Project
Work in Progress Wednesday (Thanks Freshly Pieced!),
Link it Up Thursday  (Thanks Seven Alive!) and
 Can I Have a Whoop Whoop (Thanks, Confessions of a Fabric Addict!)
Off the Wall (Thanks Nina Marie Sayre)
TGIFF (Thanks Diane – FromBlankPages!)

Happy Thanksgiving!  I am so thankful today to have had a relaxed joyous day with my family, as well as being able to do many of my projects.  My sweet husband did much of the cooking, to help keep me out of the kitchen, as I’ve worked very hard this year to get down to my goal weight by losing 30 lbs (and keeping it off.)  I do love to cook, but I knew I’d be tempted to taste all day long!  He did ask my support in one thing, however… clearing some space in the freezer for the leftovers.

Well, that meant that it was time to get into my dye studio- I had to use up the snow I’ve had in the freezer since last winter- time for snow-dyeing!  It’s also a great way to use up some left-over old dyes.  While the colors may not come out quite as rich or vibrant, I’ll always be able to over-dye or do additional surface design on the fabrics.  So I prepared 4 separate yards of cotton, put each in it’s own container, packed the snow on top, and poured 3 colors of dye onto each one.  It looks like giant snow cones! 

Ryan, my Viking warrior

Since I was already dyeing, I also mixed up a fresh batch and dyed a couple yards of linen.  I’ve never tried dyeing linen before, nor is it a material I use in my artwork.  The things we will do for our children!  My son, now 17, is fascinated with Viking culture and hopes to go into anthropology and/or archeology.  He’s found that there are Viking re-enactment groups, similar to the ones that put on Renaissance fairs, and has talked me into going to a holiday “Good Yule” celebration in full Viking dress.   Of course, it has to be authentic!  Last week I taught him basics of sewing on my Bernina (ok, not so authentic that we’re going to sew it by hand!) and he made his own Viking tunic out of wool.  He’s still deciding if he wants me to dye it or not (it’s currently a beige-brown.)  The linen I’m dyeing will be for a Viking apron, the style which they wore around the tenth century.  I’ll make sure to post the pictures when we have our outfits complete!

I’ve been working on encouraging my Mom to start back to sewing again, so she brought over her machine and a Christmas table-runner project which she had started.  She was having some problems with mitering the binding.  It’s easy to get confused with a mitered binding if you are used to making a mitered border on a quilt.  The process is a bit different, since you’re turning the finding to the back side.  She also some a 60 degree angles, which I admit I had to look up how to bind.  Thank goodness for Google!

Once I had my Mom going, I started working on some freemotion quilting samples from the wonderful collection by Leah Day on her FreeMotion Quilting BlogIf you are interested in improving your quilting stitches, I can’t recommend Leah’s blog highly enough.  Here is theCalm Sea” design which I stitched this afternoon.  I have several notebooks of practice samples such as this, which I  keep adding to on a regular basis.  Then, when I am ready to stitch a project, I can look through my samples and think about what would work best for the piece. 

Tomorrow I’m taking off with my husband for a few days, so I’ve packed my sketchbooks and look forward to looking for new design inspiration, as well as working on thinking through some of what I’d like to accomplish in the year ahead.